WiseHR
An online collaboration and automation tool to manage your company’s HR workflows.
Overview
This in-house leave management tool has been introduced to minimize disagreements between employees and HR regarding leaves and to simplify the process of requesting and granting leave. The aim is to eliminate the hassle associated with leave management and bring a more straightforward approach to the process.
In addition to streamlining, my client aimed to introduce other HR-related features to standardize the processes within the company.
The Problem
The HR team was facing a tedious manual process of keeping track of employee leave statuses. This resulted in frequent conflicts between HR and employees over leave balances and a lack of a proper system for requesting and granting leave. It was time for a change to streamline the leave management process and eliminate these challenges.
The Solution
The client's goal was to launch a user-friendly MVP for a leave management solution within three months, with the primary objective of simplifying the leave request process for both the organization and employees. Additional features are planned to be added in future updates.
My Role
As both the project manager and UX lead, I was tasked with the challenge of managing a team of developers and QAs while also focusing on the user experience. Despite being new to project management, I was determined to meet the three-month deadline with the help of my team. To achieve this, I helped define the user stories and features for the MVP, and utilized the agile-scrum process to plan and organize deliverables. My responsibilities included:
My tasks
- Breaking down epics, user stories, and tasks
- Planning and scope definition
- Team capacity planning
- Define acceptance criteria
- Review UX/UI designs
- Monitoring task completion
- Communicating progress to stakeholders
Here, I have detailed the steps I took as the project manager throughout each phase of the MVP.
My role in each phase of creating the MVP
The process of building the MVP
Building an MVP is a process that requires careful planning and execution to ensure its success. The following steps were taken to build the MVP of our WiseHR MVP:
- Define the Problem Statement: The first step was to understand the challenges facing the HR team and employees with regard to leave management.
- Market Research: Next, we conducted research to understand the current market solutions and to identify the best practices in the industry.
- Identify Key Features: Based on the problem statement and market research, we identified the key features that our MVP needed to have.
- Prioritize and Simplify: With a long list of features, it was important to prioritize and simplify the MVP to ensure that it was user-friendly and delivered value to the users.
- Develop and Pre-Launch Test: The development phase was crucial, and we made sure to test the MVP thoroughly before the launch.
- Launch MVP: Finally, we launched the MVP and started getting feedback from users.
- Practice B.M.L.: To continuously improve the MVP, we followed the Build-Measure-Learn cycle, where we incorporated feedback and made improvements based on user feedback.
By following these steps, we were able to deliver a leave management application that met the needs of the HR team and employees.

Process of creating the MVP
STEP 1
Define the problem statement
As the project manager and UX lead, I initiated the project by holding a preliminary stakeholder meeting with the client and my team. Our objective was to gain a deep understanding of the HR challenges faced by the client and what they were hoping to achieve with a streamlined MVP product.
The client had tried several HR applications in the past but found them to be too complex and costly. They needed a solution that would prioritize their most critical workflows and could be adapted to comply with the laws in their country.
Starting from the client's well-defined requirements document, I worked with the UX team to clarify the goals and streamline the process. Through a collaborative brainstorming session, we made sure that all essential elements were covered, resulting in a solution that met the client's needs and exceeded their expectations.
Objectives
Employee
- Ease of access to personal and employment information.
- Self-service HR transactions
- Improved communication and transparency
- Facilitation of a positive employee experience
Admin
- Streamlining HR processes
- Improved data management
- Increased efficiency and enhanced compliance
- Better decision-making
- Improved employee engagement
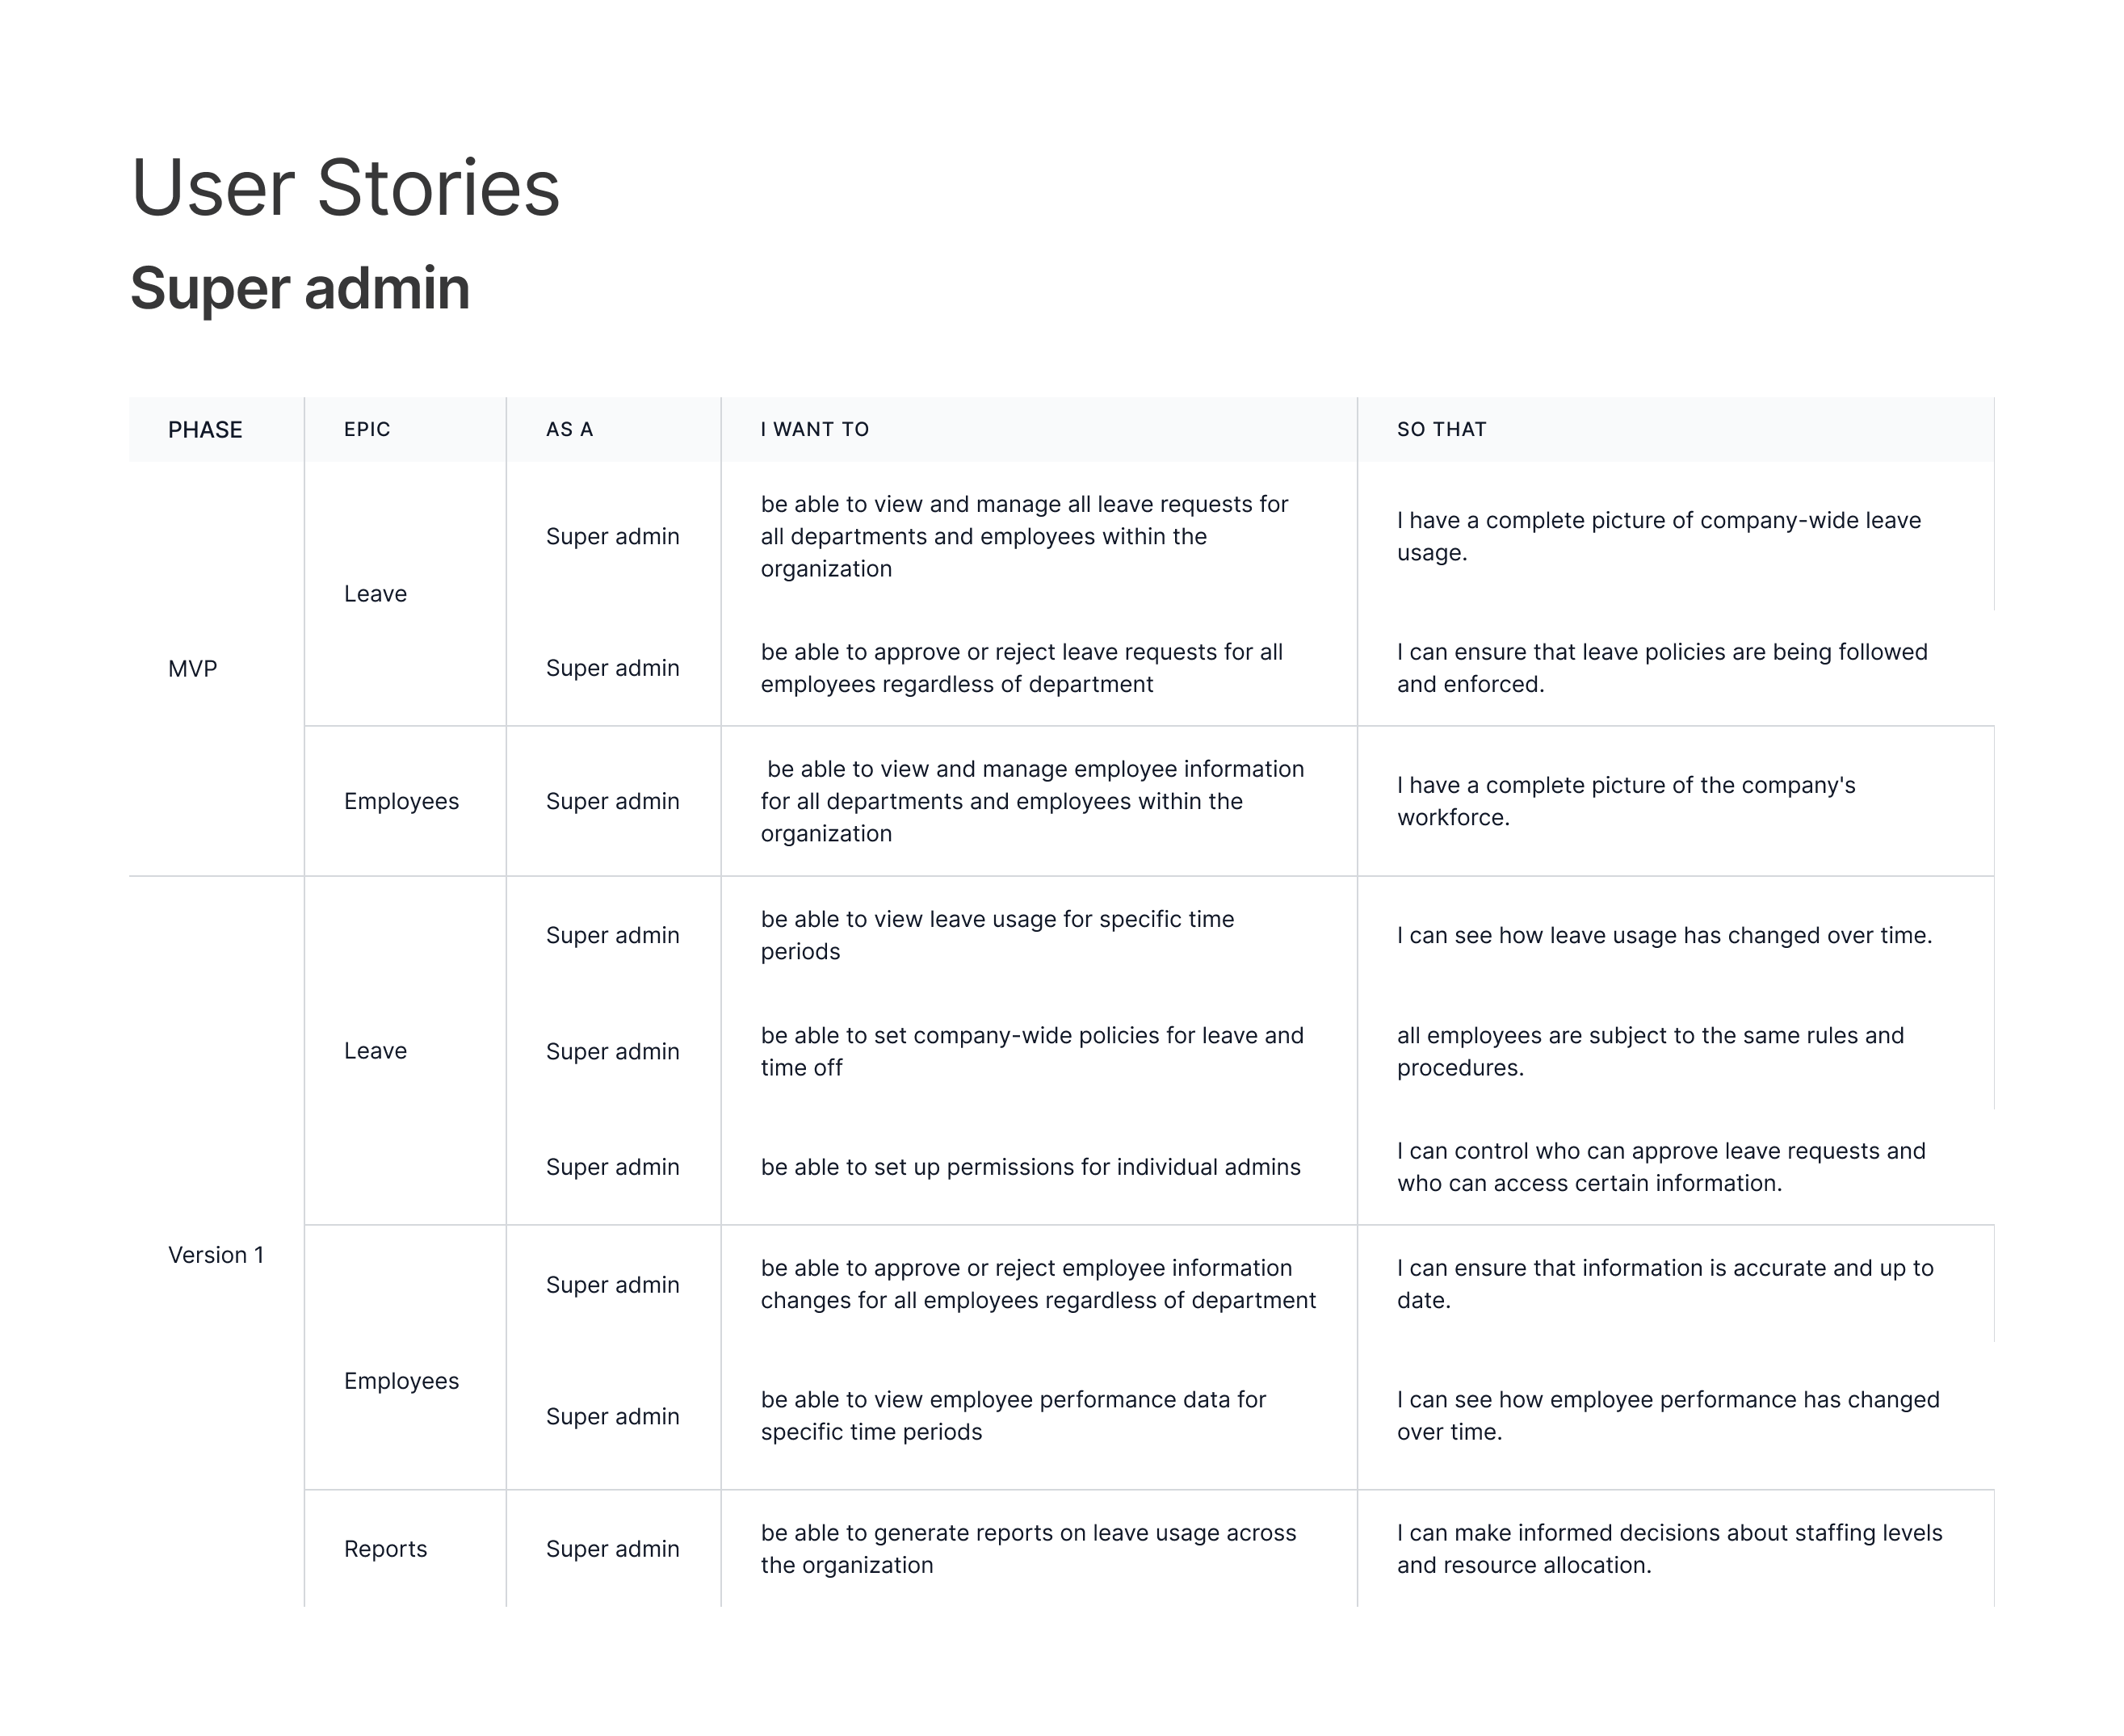
Super admin
- Centralized HR management
- Improved data analytics and reporting
- Enhanced HR performance
- Better alignment with business goals
- Integration with other systems
STEP 2
Market Research
The next step was to perform market research. This enabled my team to identify our competitors and understand if similar solutions exist in the market. It was crucial to determine what makes our product stand out.
We selected a few prominent HR applications available in the market and conducted a competitor analysis based on their features. Through this analysis, we were able to identify growth opportunities and gain a competitive advantage.

Competitor analysis
Identifying our target audience was a crucial aspect of our process. Through thorough research, we identified three distinct user profiles - Employee, Admin, and Super Admin. By gaining a deep understanding of the needs, preferences, and requirements of our potential users, we could more effectively design our product to meet their expectations and achieve maximum success
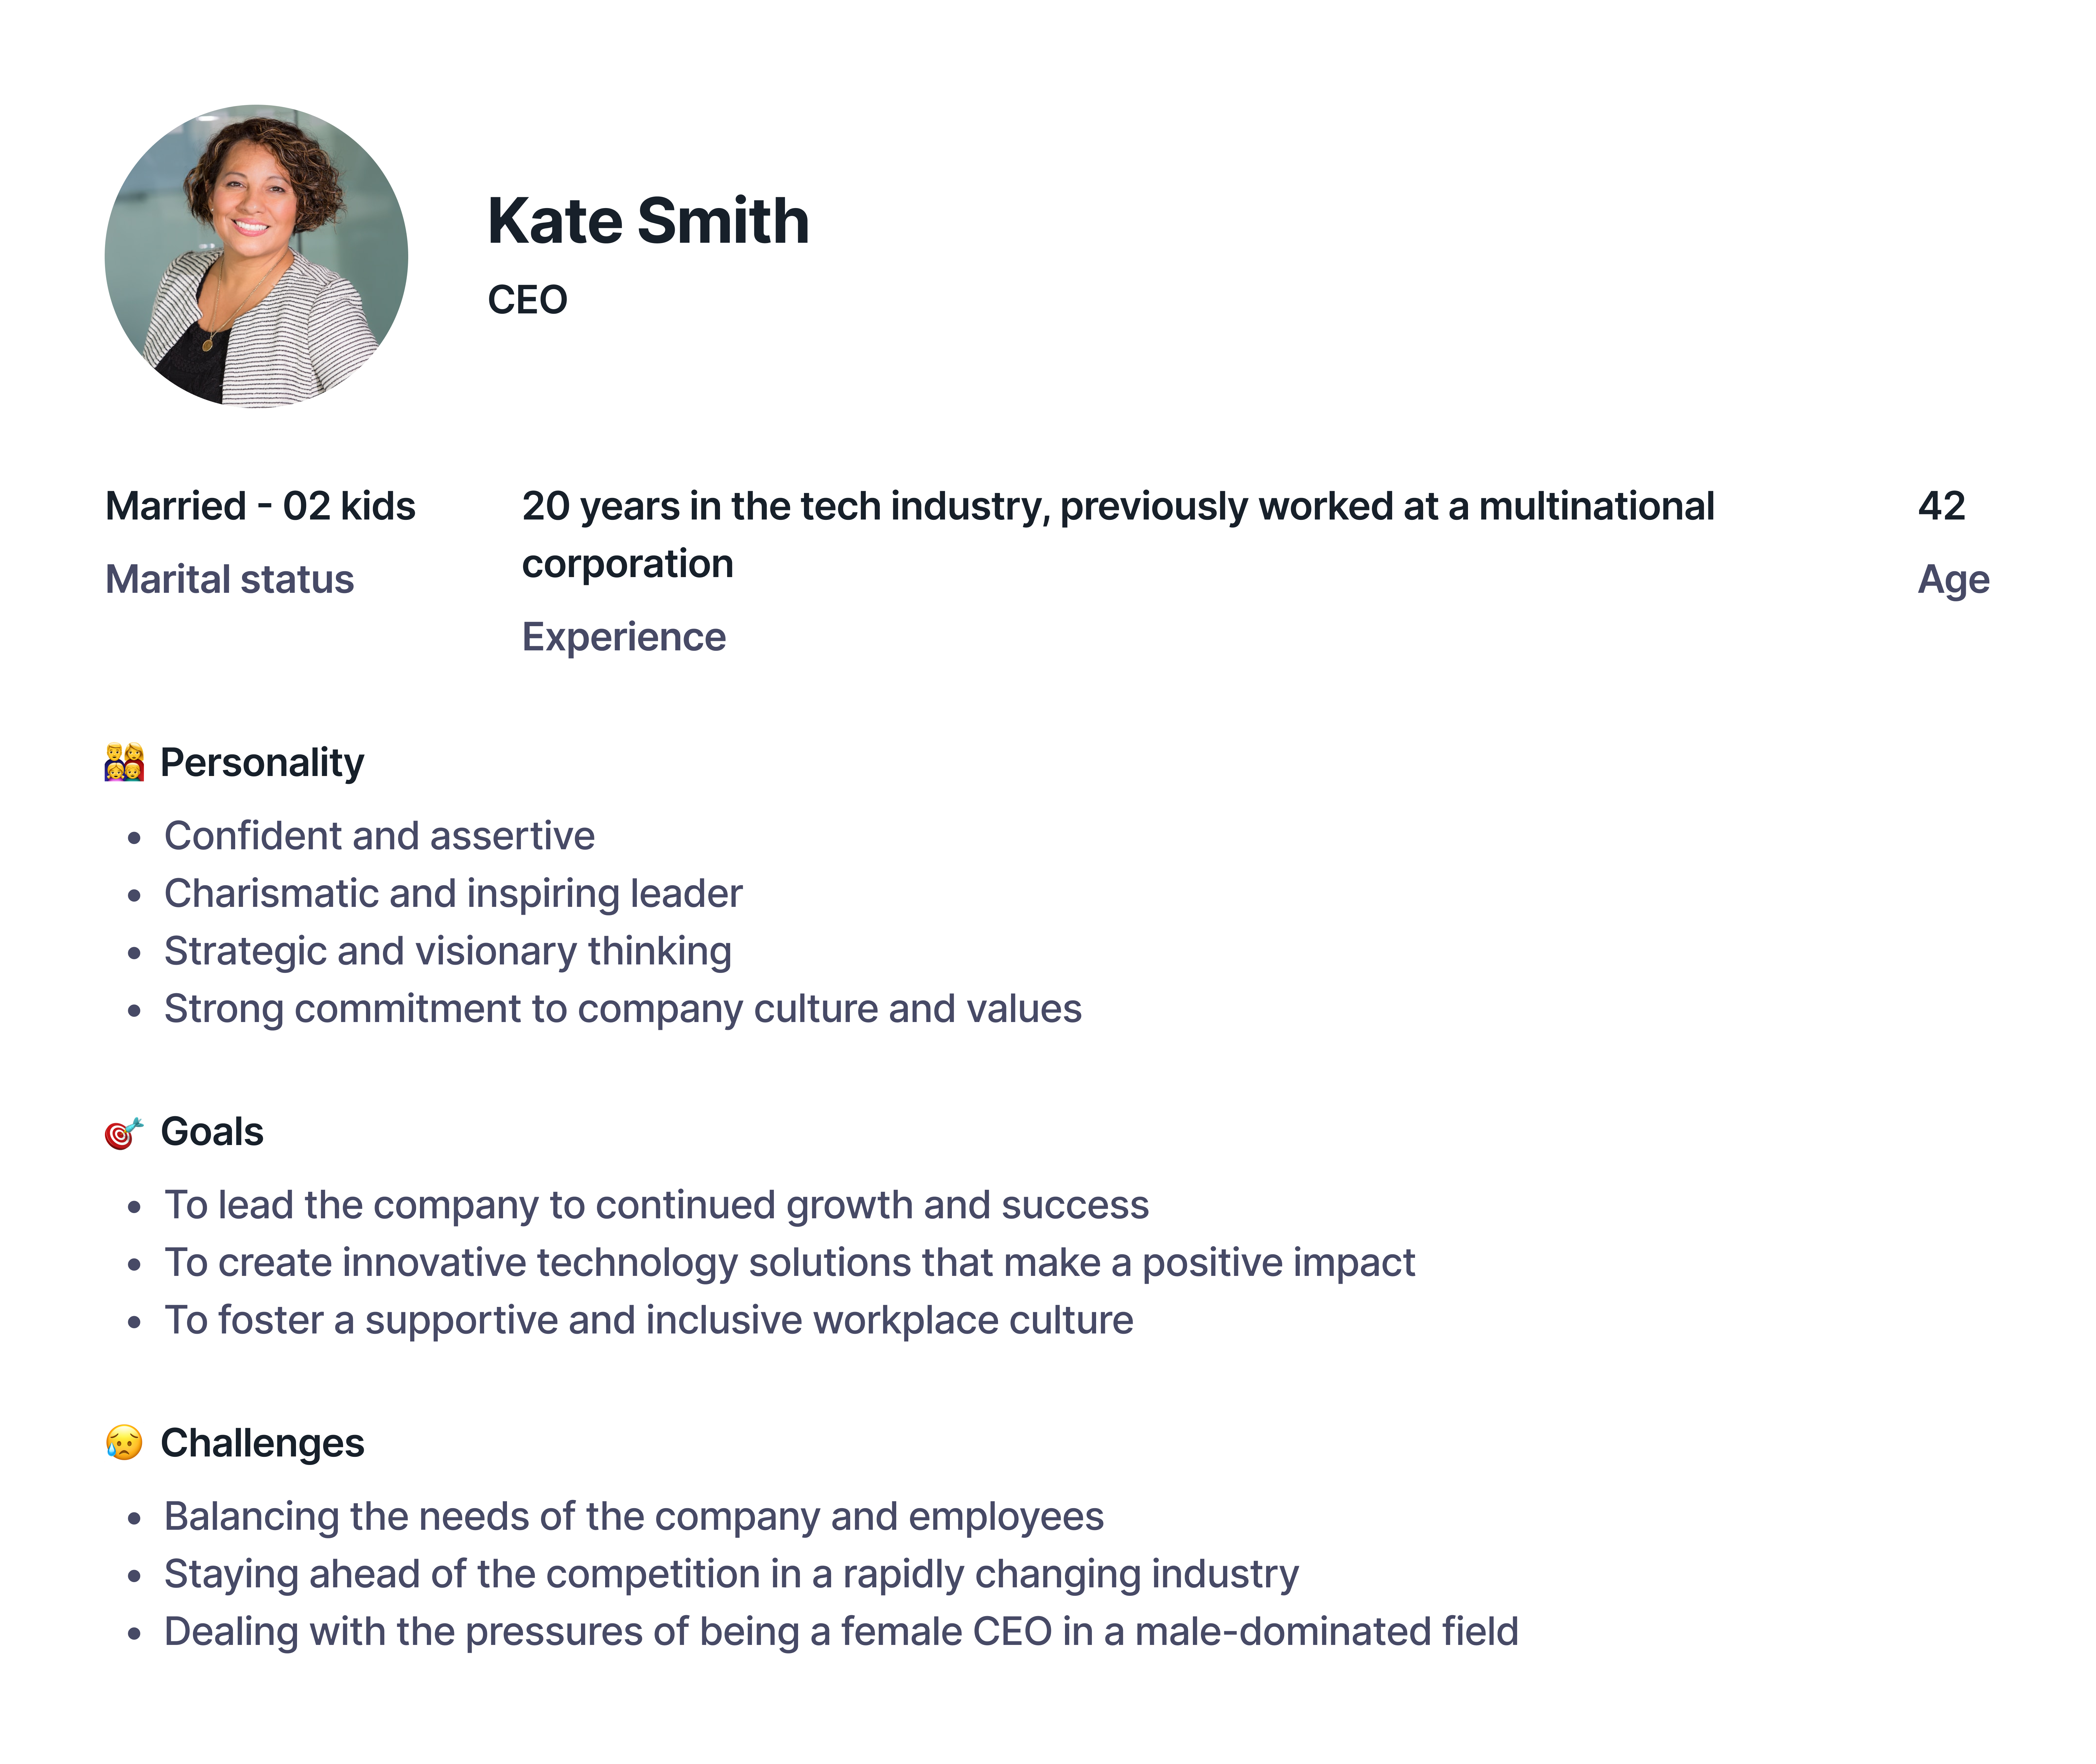
Following are the user personas we created for the main users of the WiseHR.
Employee persona
Admin persona
Super admin persona
With the client's specifications in hand, we went a step further to gain a deeper understanding of the end users' motivations and needs. My UX team reconvened to perform an HMW analysis, which aimed to gain insight into the specific requests, requirements, and issues that the users wanted to address through the use of the application. This helped us gain a clearer understanding of the desired features and ensured that the product effectively and meaningfully meets their needs.
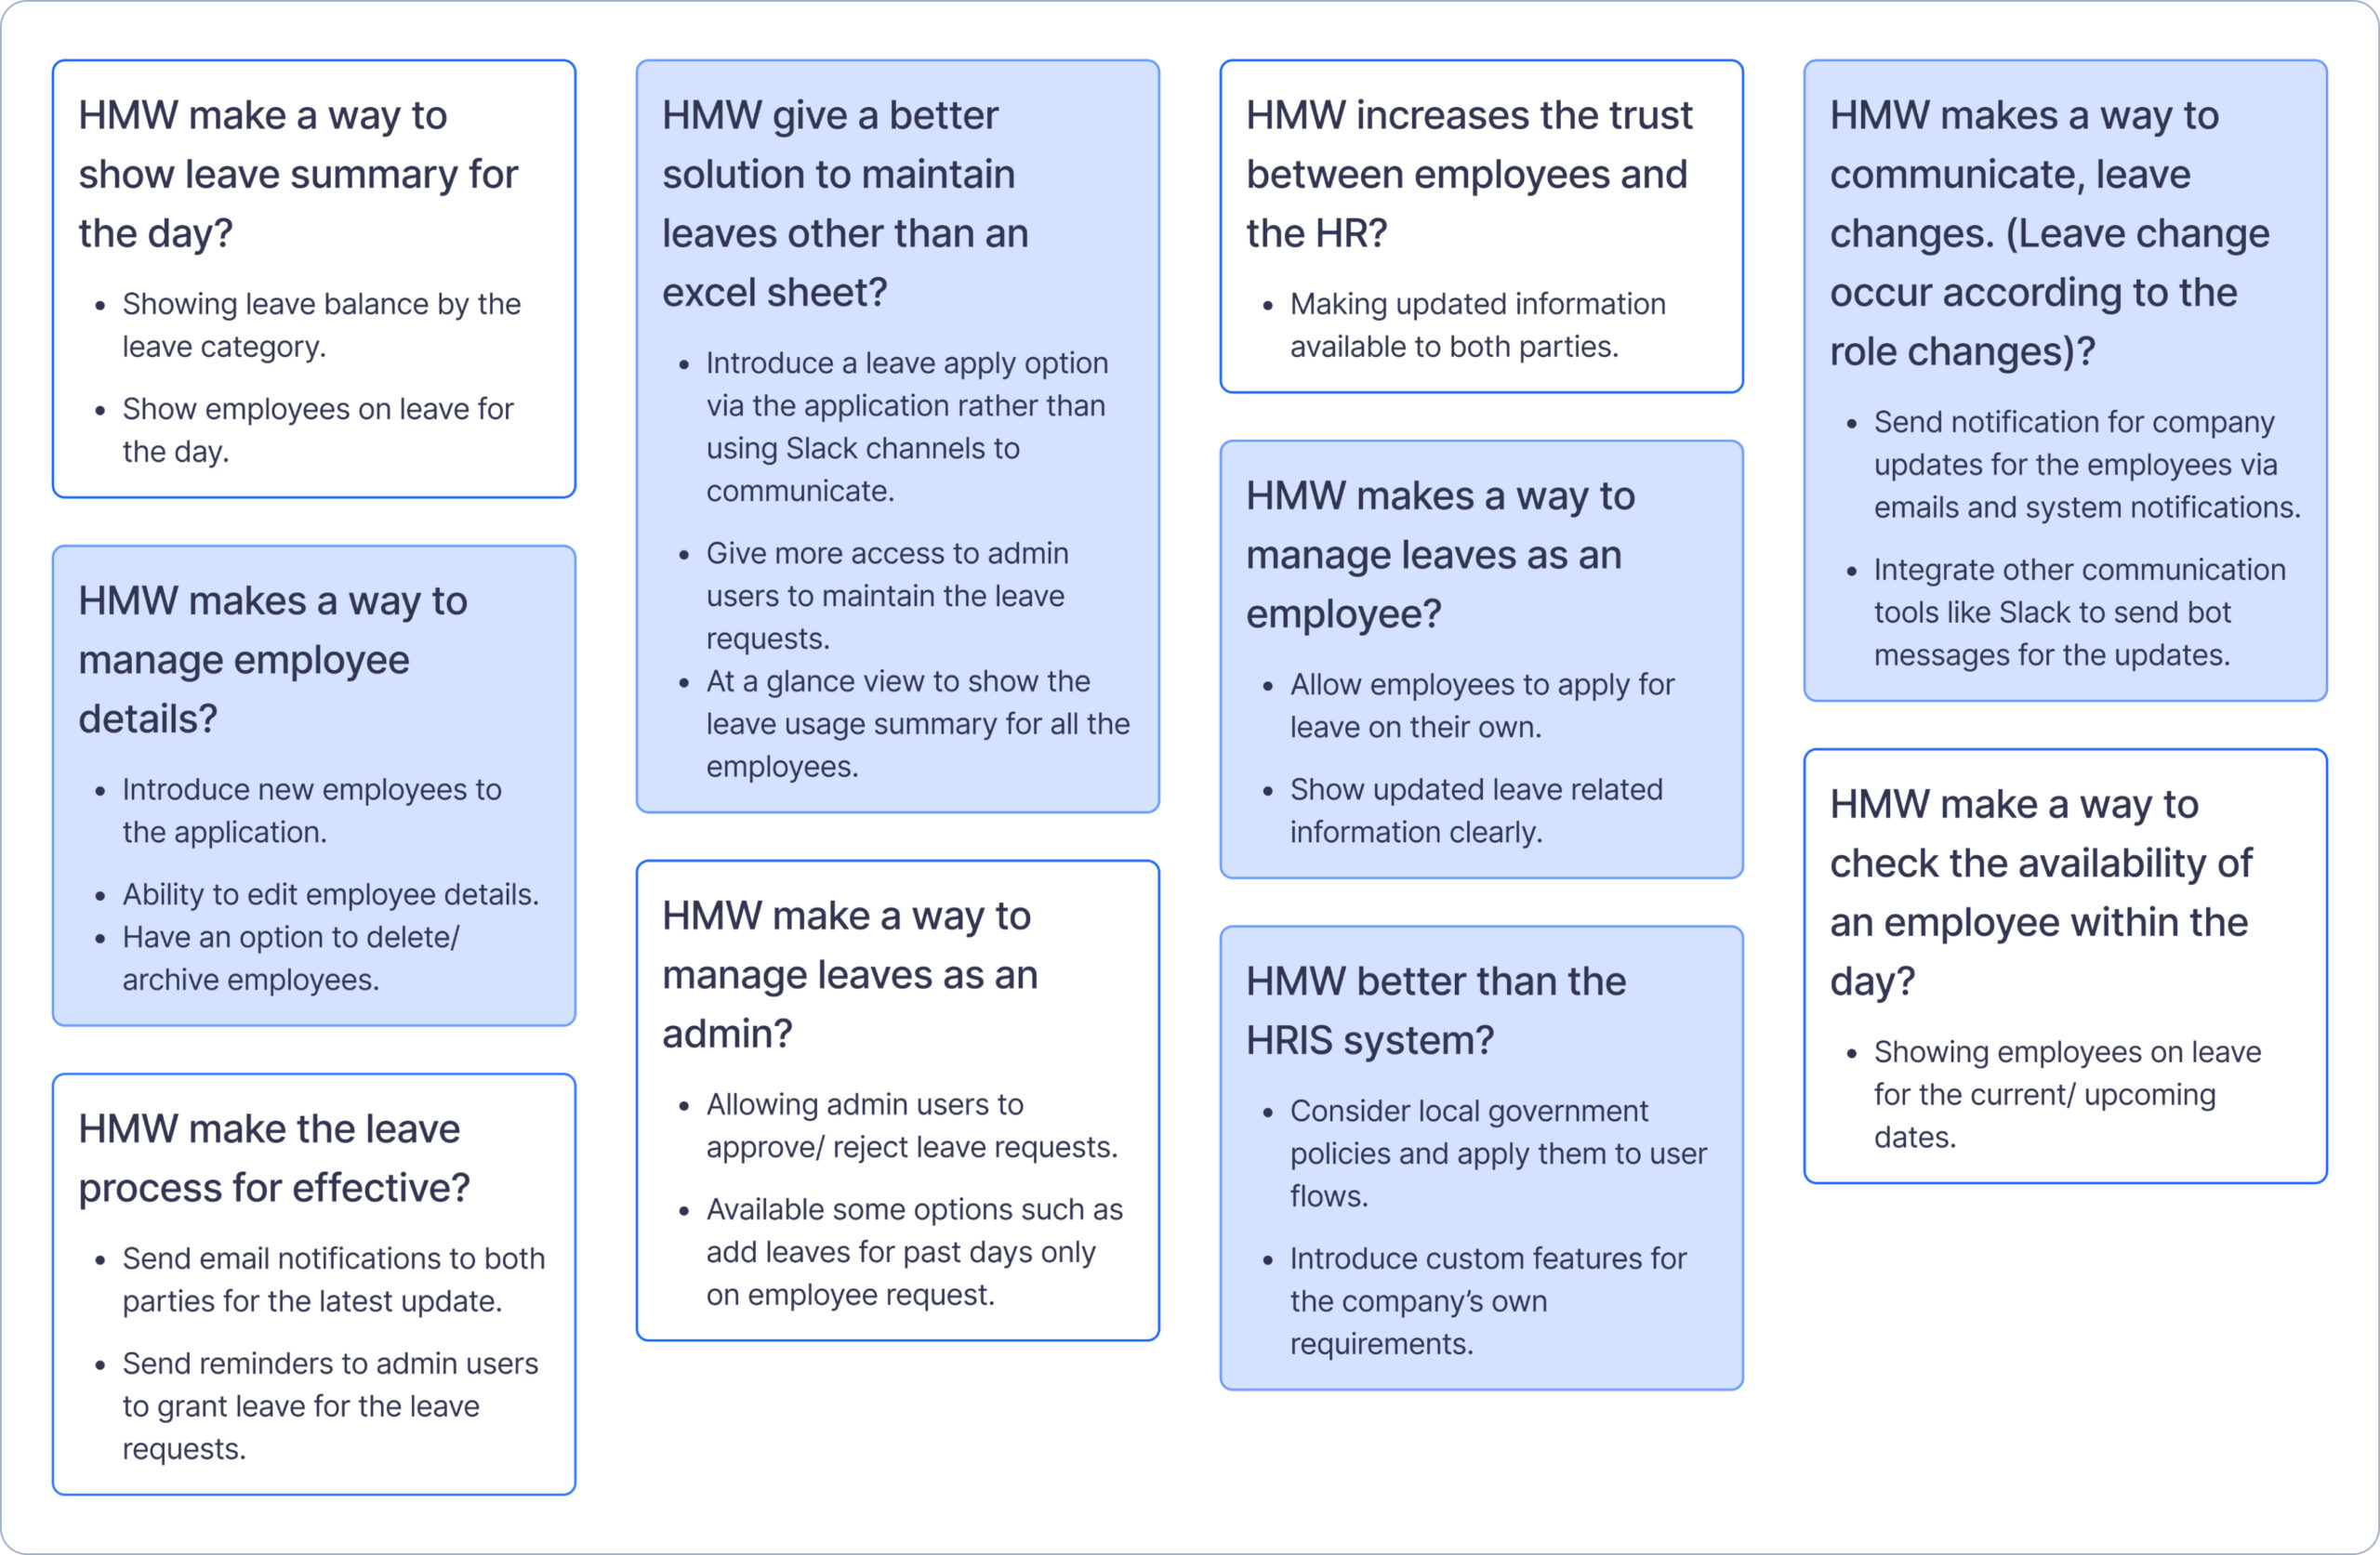
HMW analysis
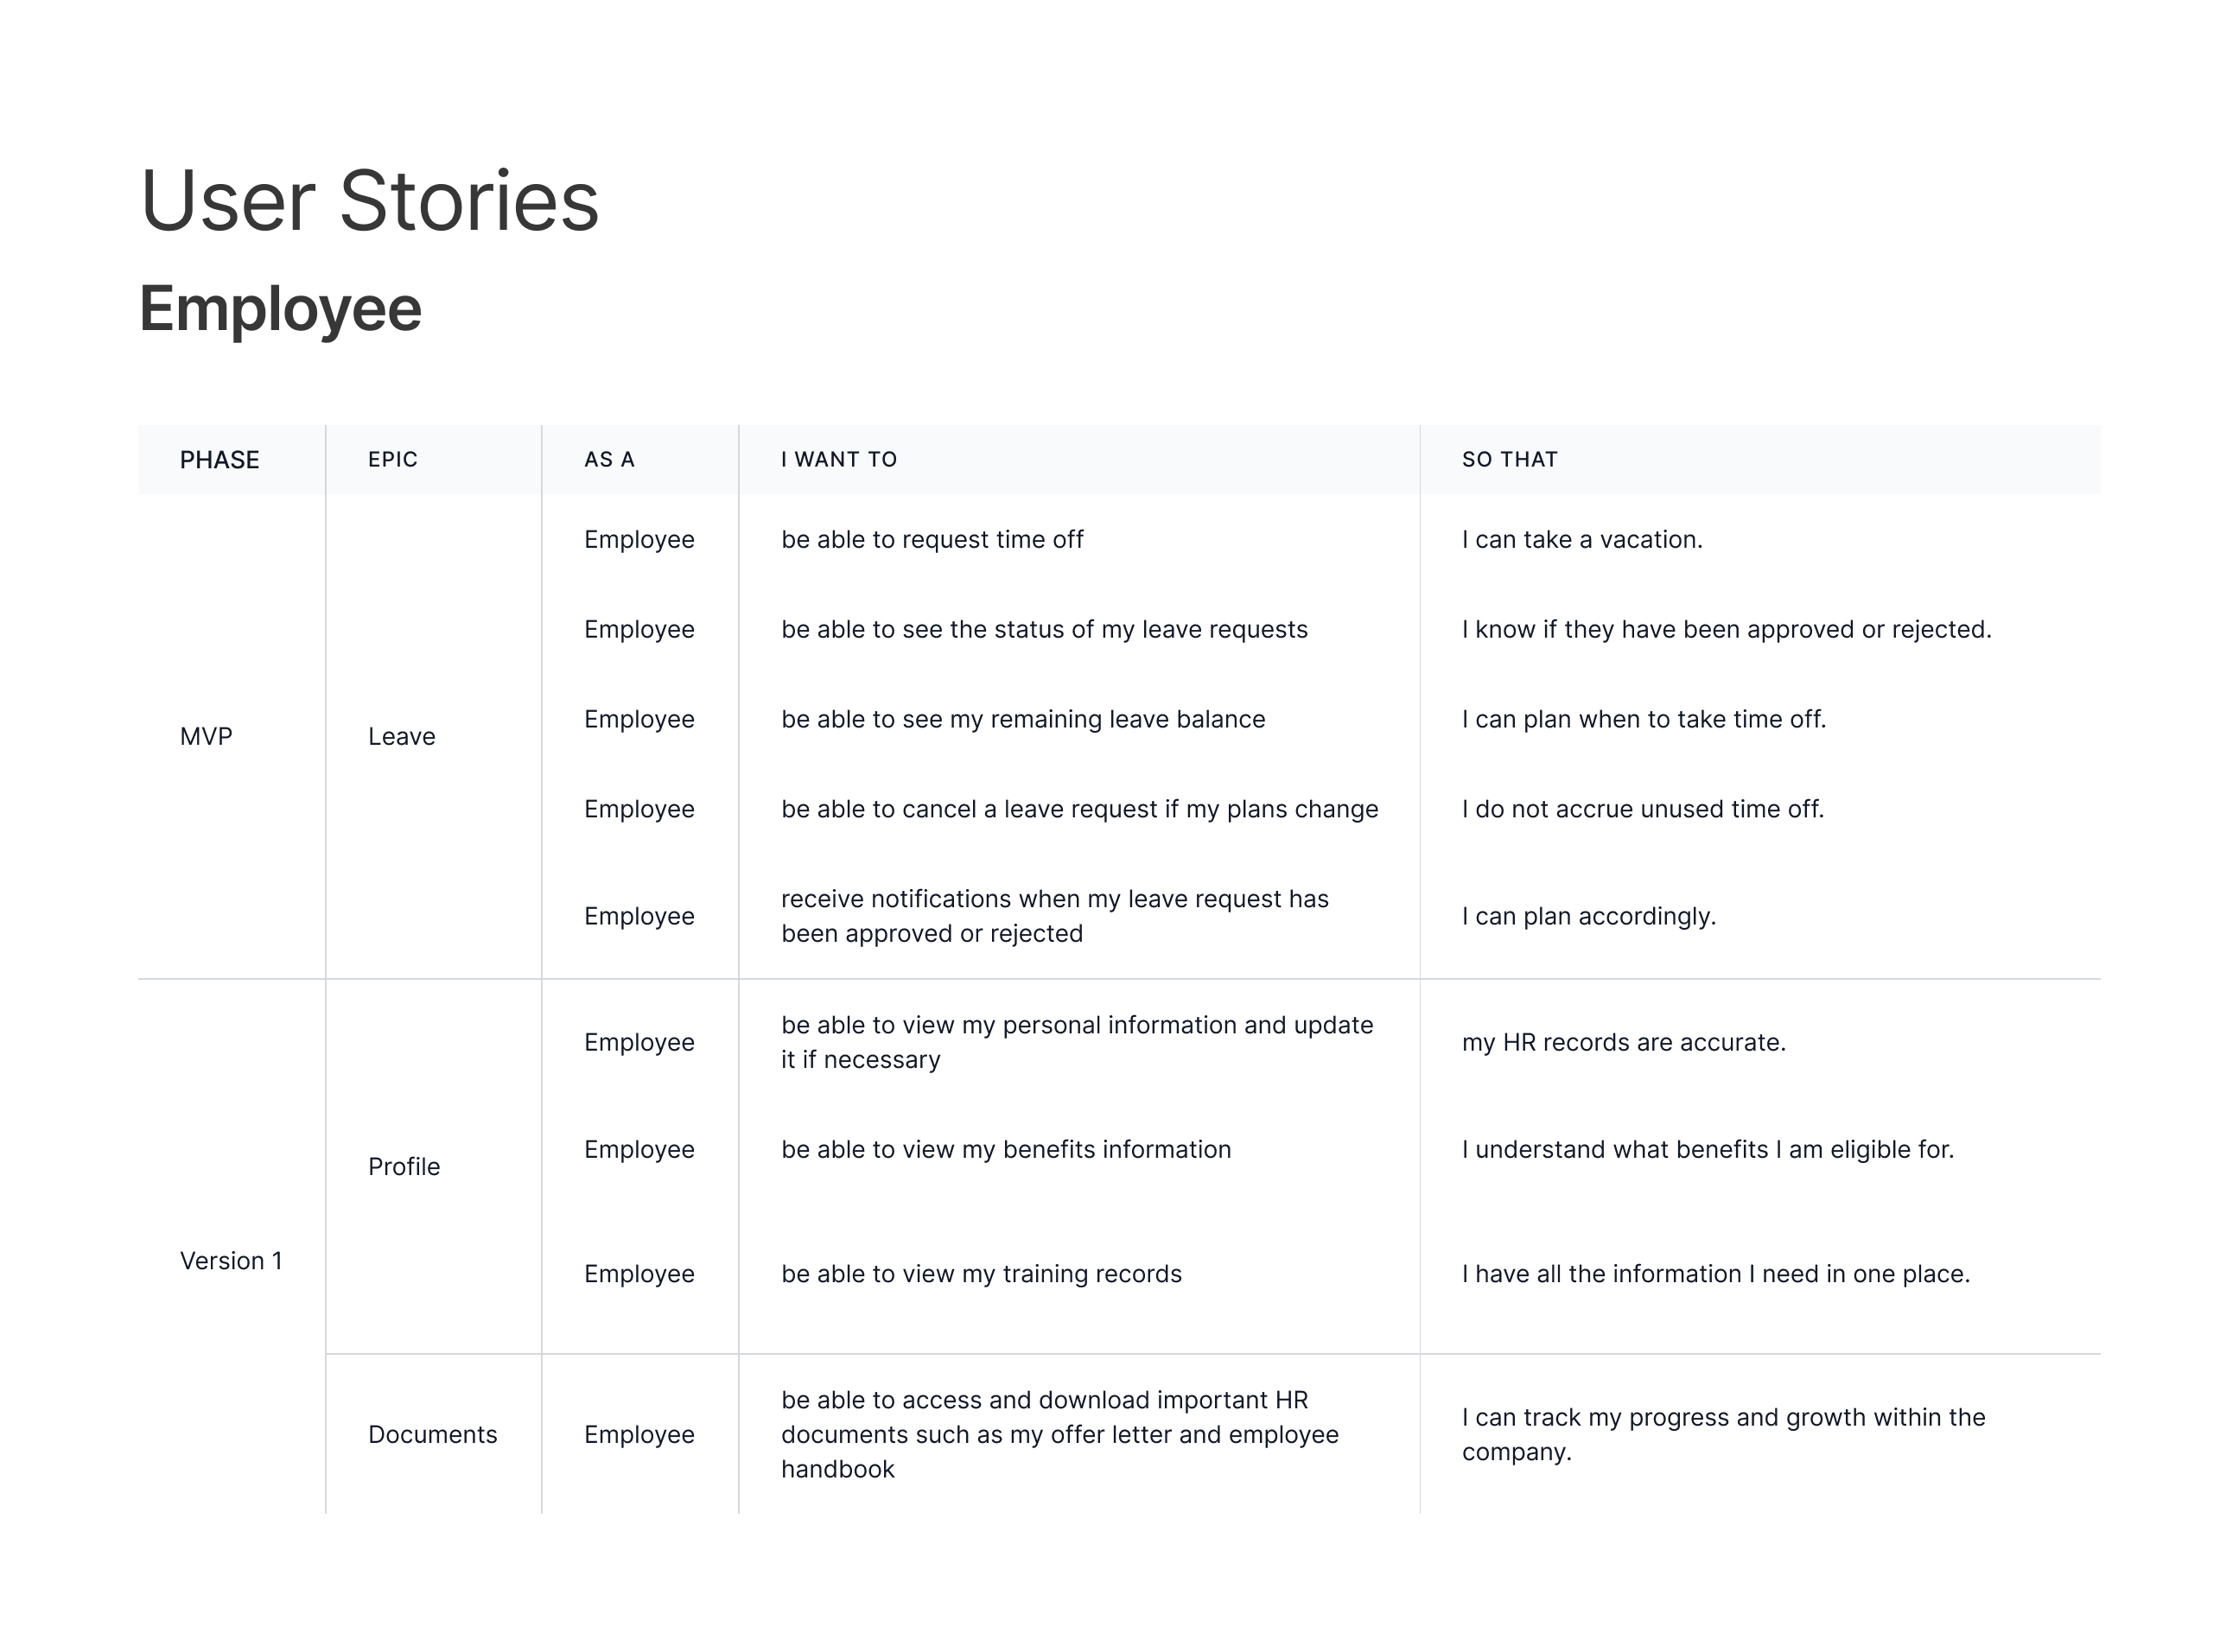
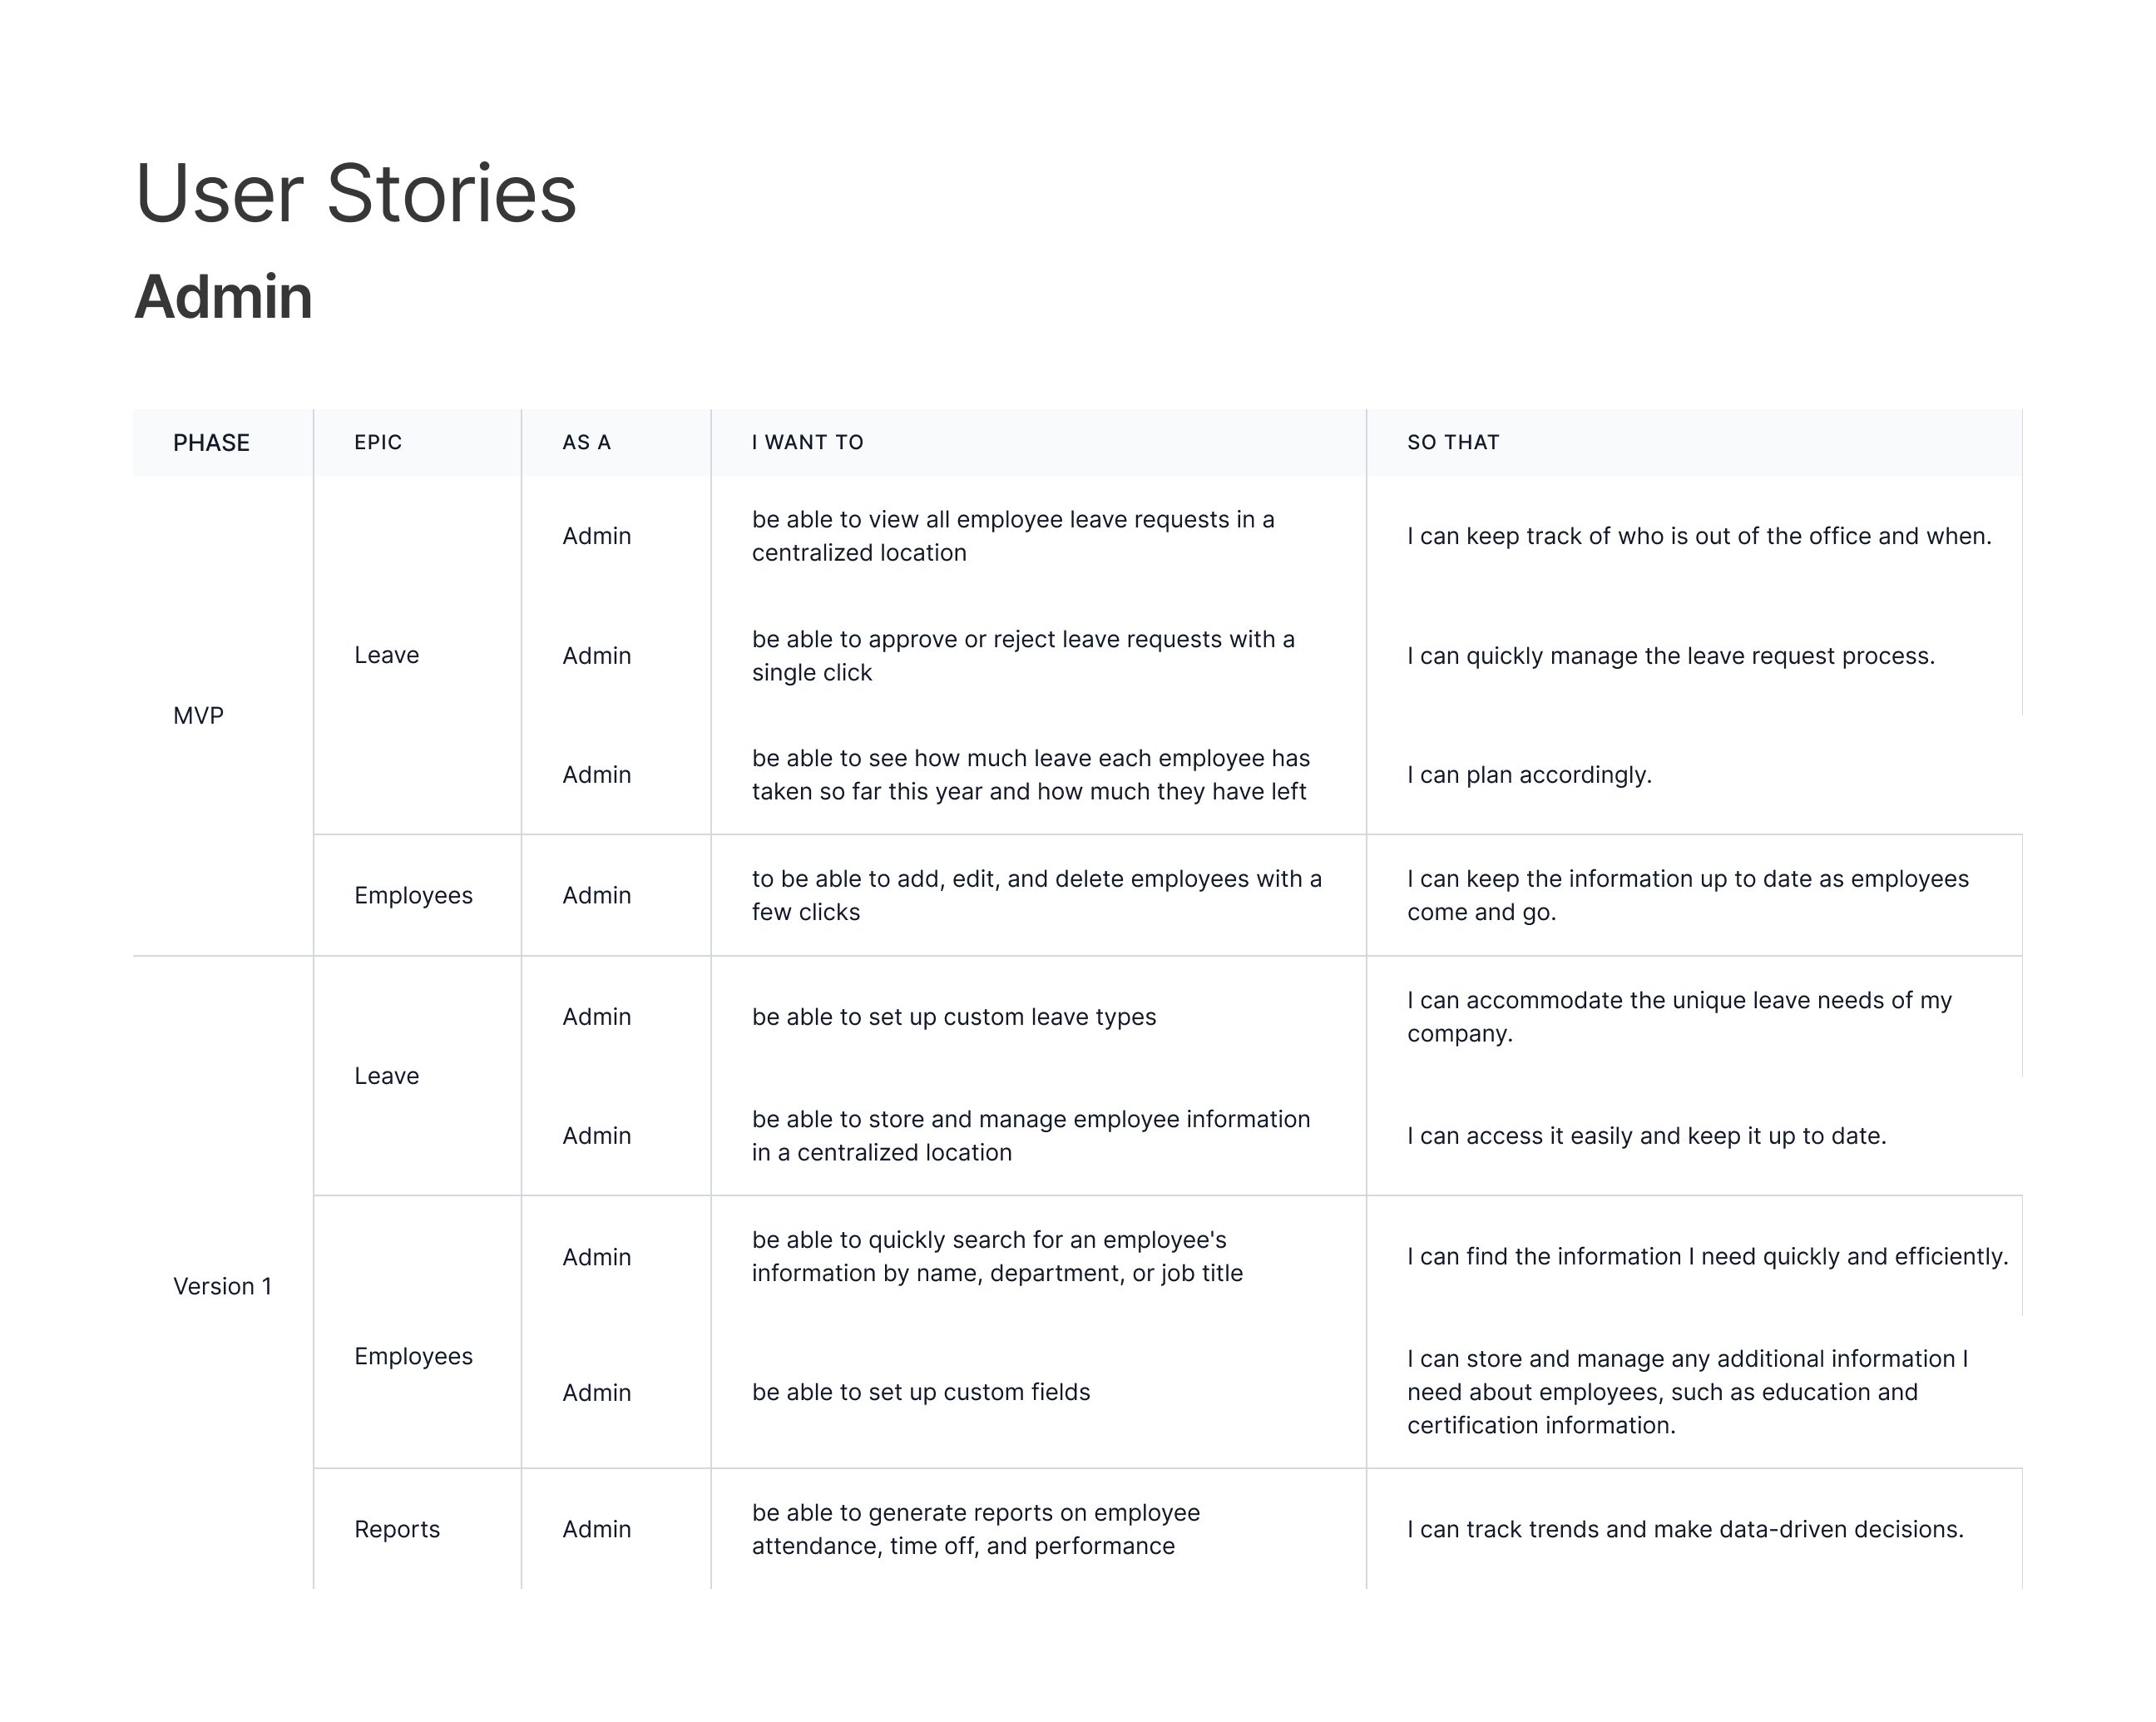
After generating many solutions through the HMW method, I conducted a brainstorming session to re-examine the responses, categorize them, and choose the most suitable ones. Next, we utilized affinity mapping to group these solutions into similar categories. This helped me identify the crucial processes for the application (epics), identify individual tasks within these processes, and formulate them as user stories (features)
The following step was to identify the assumptions and limitations of the MVP of the application. By addressing these assumptions and constraints, I aimed to address them earlier in the process and improve the user experience.
Assumptions
- User authentication for every user before gaining access to the system.
- Manage basic employee information, such as name, contact information, job title, and department.
- Track and manage employee time off requests, including paid time off, sick leave, and other types of absences.
- Meet relevant HR regulations, such as labor laws and data privacy requirements.
Constraints
- Time and budget.
- Technical expertise.
- Meet relevant data privacy and security regulations, and should include appropriate measures to protect sensitive employee information.
- Designed to be scalable and adaptable, so that it can be easily expanded and customized as the organization's needs change over time.
After establishing the assumptions and constraints of the MVP, I wanted to set the success criteria for it. This would allow us to determine if the MVP is achieving its goals and providing value to the organization. Following discussions with the client and the team, the following criteria were agreed upon as the metrics for measuring the success of the MVP.
Sucess Matrics
- Task completion time
- Task completion rate
- Error rate
- Customer satisfaction
STEP 3
Identify Key Features
The goal here was to outline a comprehensive user flow, tracing the user's journey from their first encounter with the product to a successful resolution. I reconvened with the team to define these user flows, which assisted us in recognizing overlooked edge cases and features.
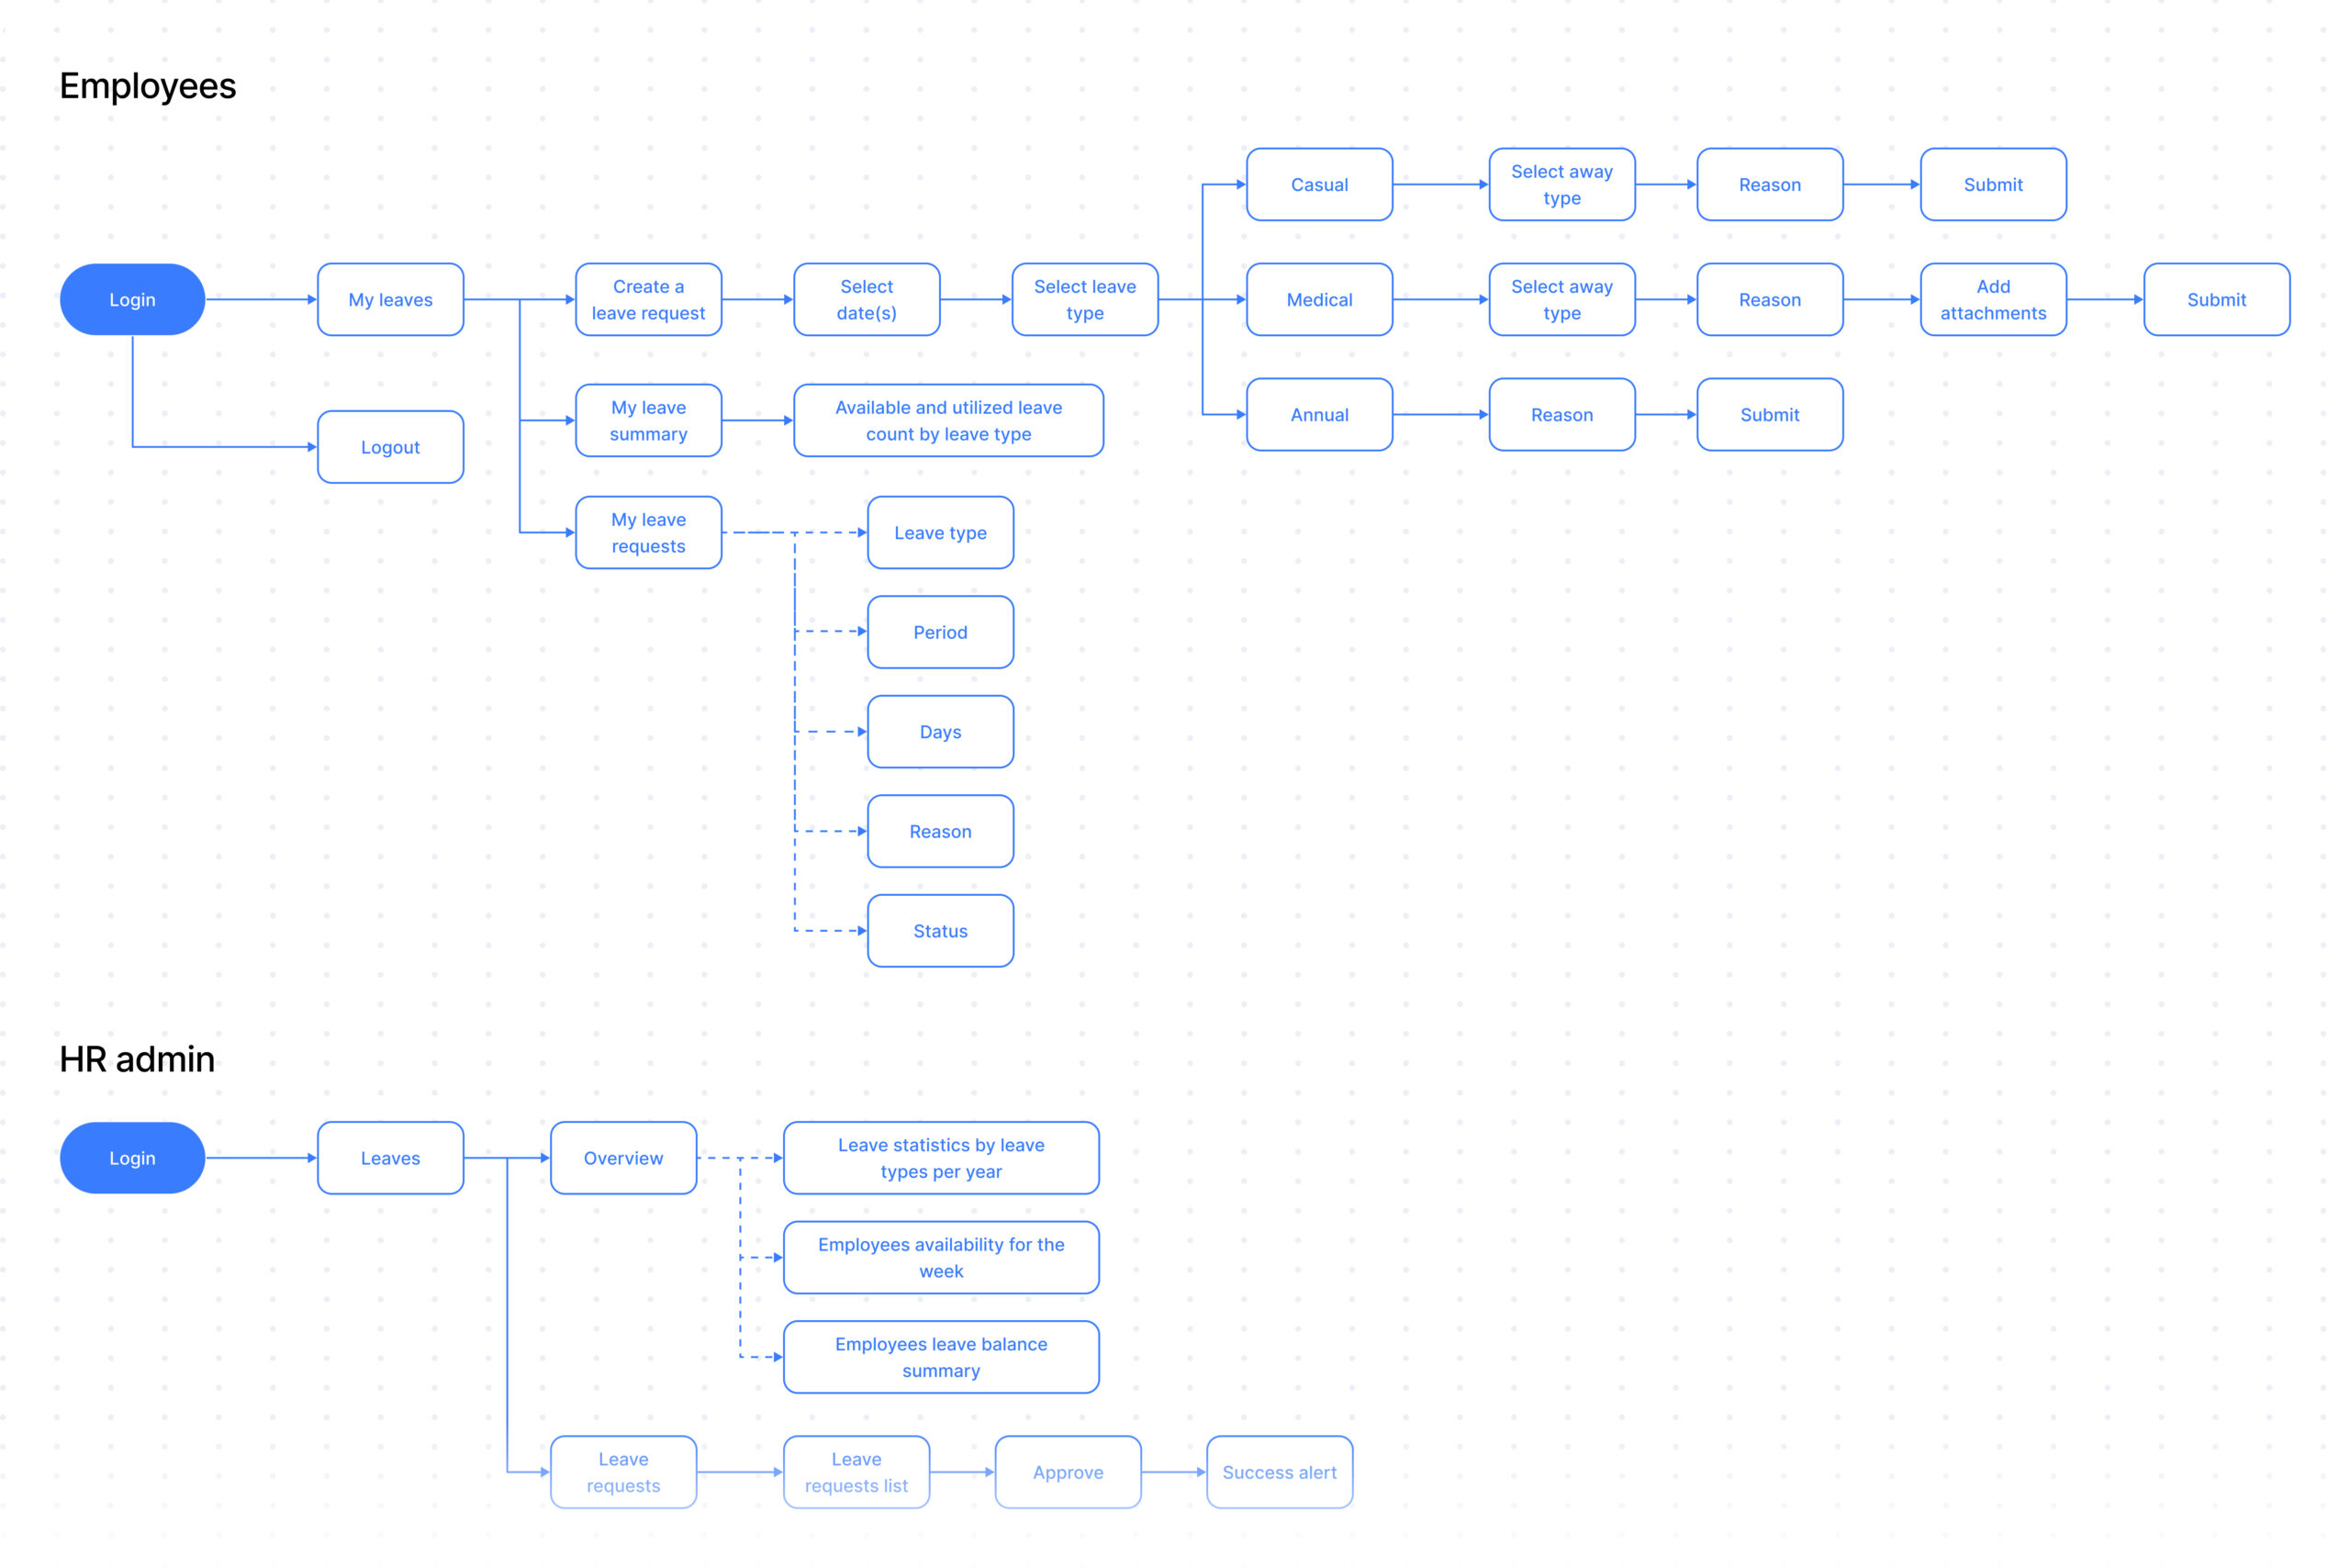
User flow
STEP 4
Prioritize and Simplify
To determine which functions should be included in the MVP, feature prioritization was deemed to be the most efficient method. The process of prioritization began with a team brainstorming session, which resulted in the creation of a list of all possible features. Each feature was then categorized based on its priority and the impact it had on the product's value.
Since the main issue faced by the client was managing employee leave, we gave the highest priority to the features related to leave management.
In addition to prioritizing the features, we also had to consider the designated timeline for the MVP release and available resources. Keeping these factors in mind, I worked with my team to prioritize and streamline the MVP using the following prioritization matrix.
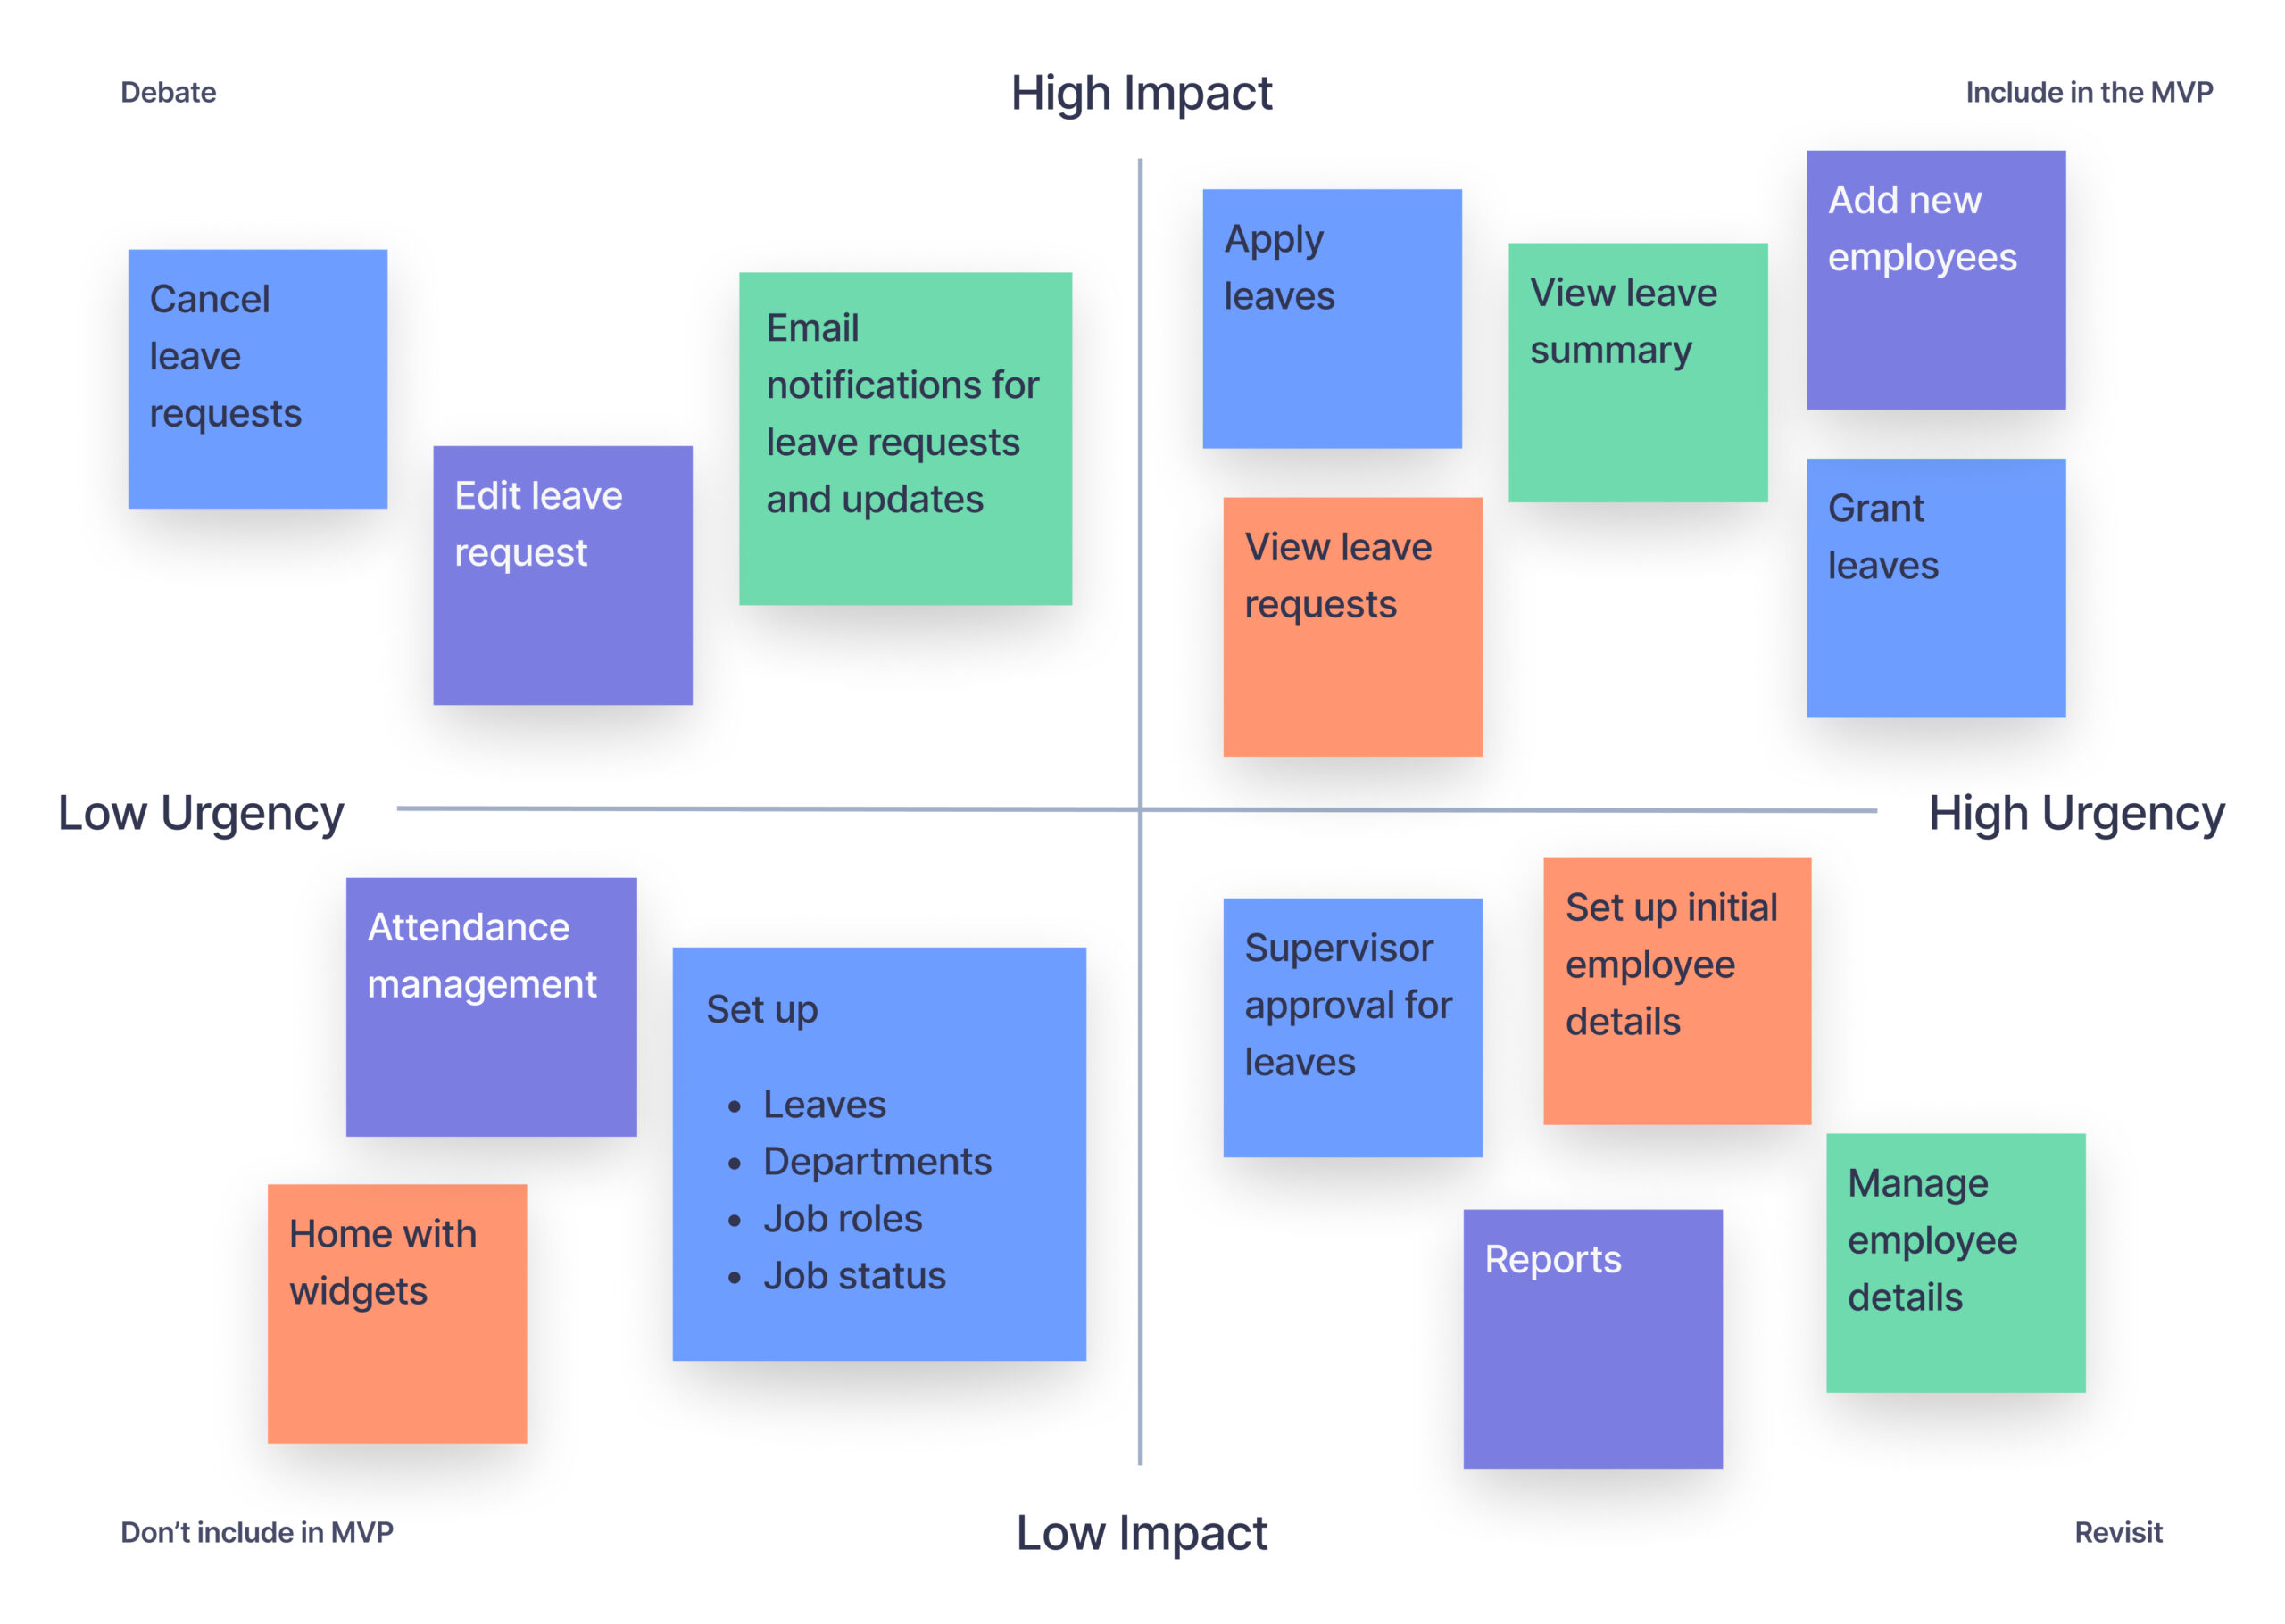
Prioritization matrix
STEP 5
Develop and Pre-Launch Test
The biggest challenge following prioritization was to implement the prioritized features within the specified timeframe. As the project manager, this phase presented the biggest challenge for me. To overcome this, I decided to break down the features into smaller parts and concentrate on completing these smaller segments within two-week sprints. Additionally, I wanted to allocate a period for pre-launch testing with internal employees. After collaborating with the team, we created the following plan and received approval from the client to proceed with the development of the MVP.
06
Sprints
12
User stories
05
Employees for pre-launch usability testing
05
Tasks to evaluate
While assisting the team with prioritizing features, the development team was simultaneously working on the backend functionalities for some of the prioritized features, as these features were commonly seen in similar applications. This allowed for a buffer between the UX team and the development team and saved time for testing as well.
As the project manager, I was assigned to this project to expedite the design process and offered my support to the UX team by designing a few screens. I also had the responsibility of delivering the final UX deliverables. By working together, we were able to complete the UI designs for the prioritized features.
The following are some of the screens I designed.
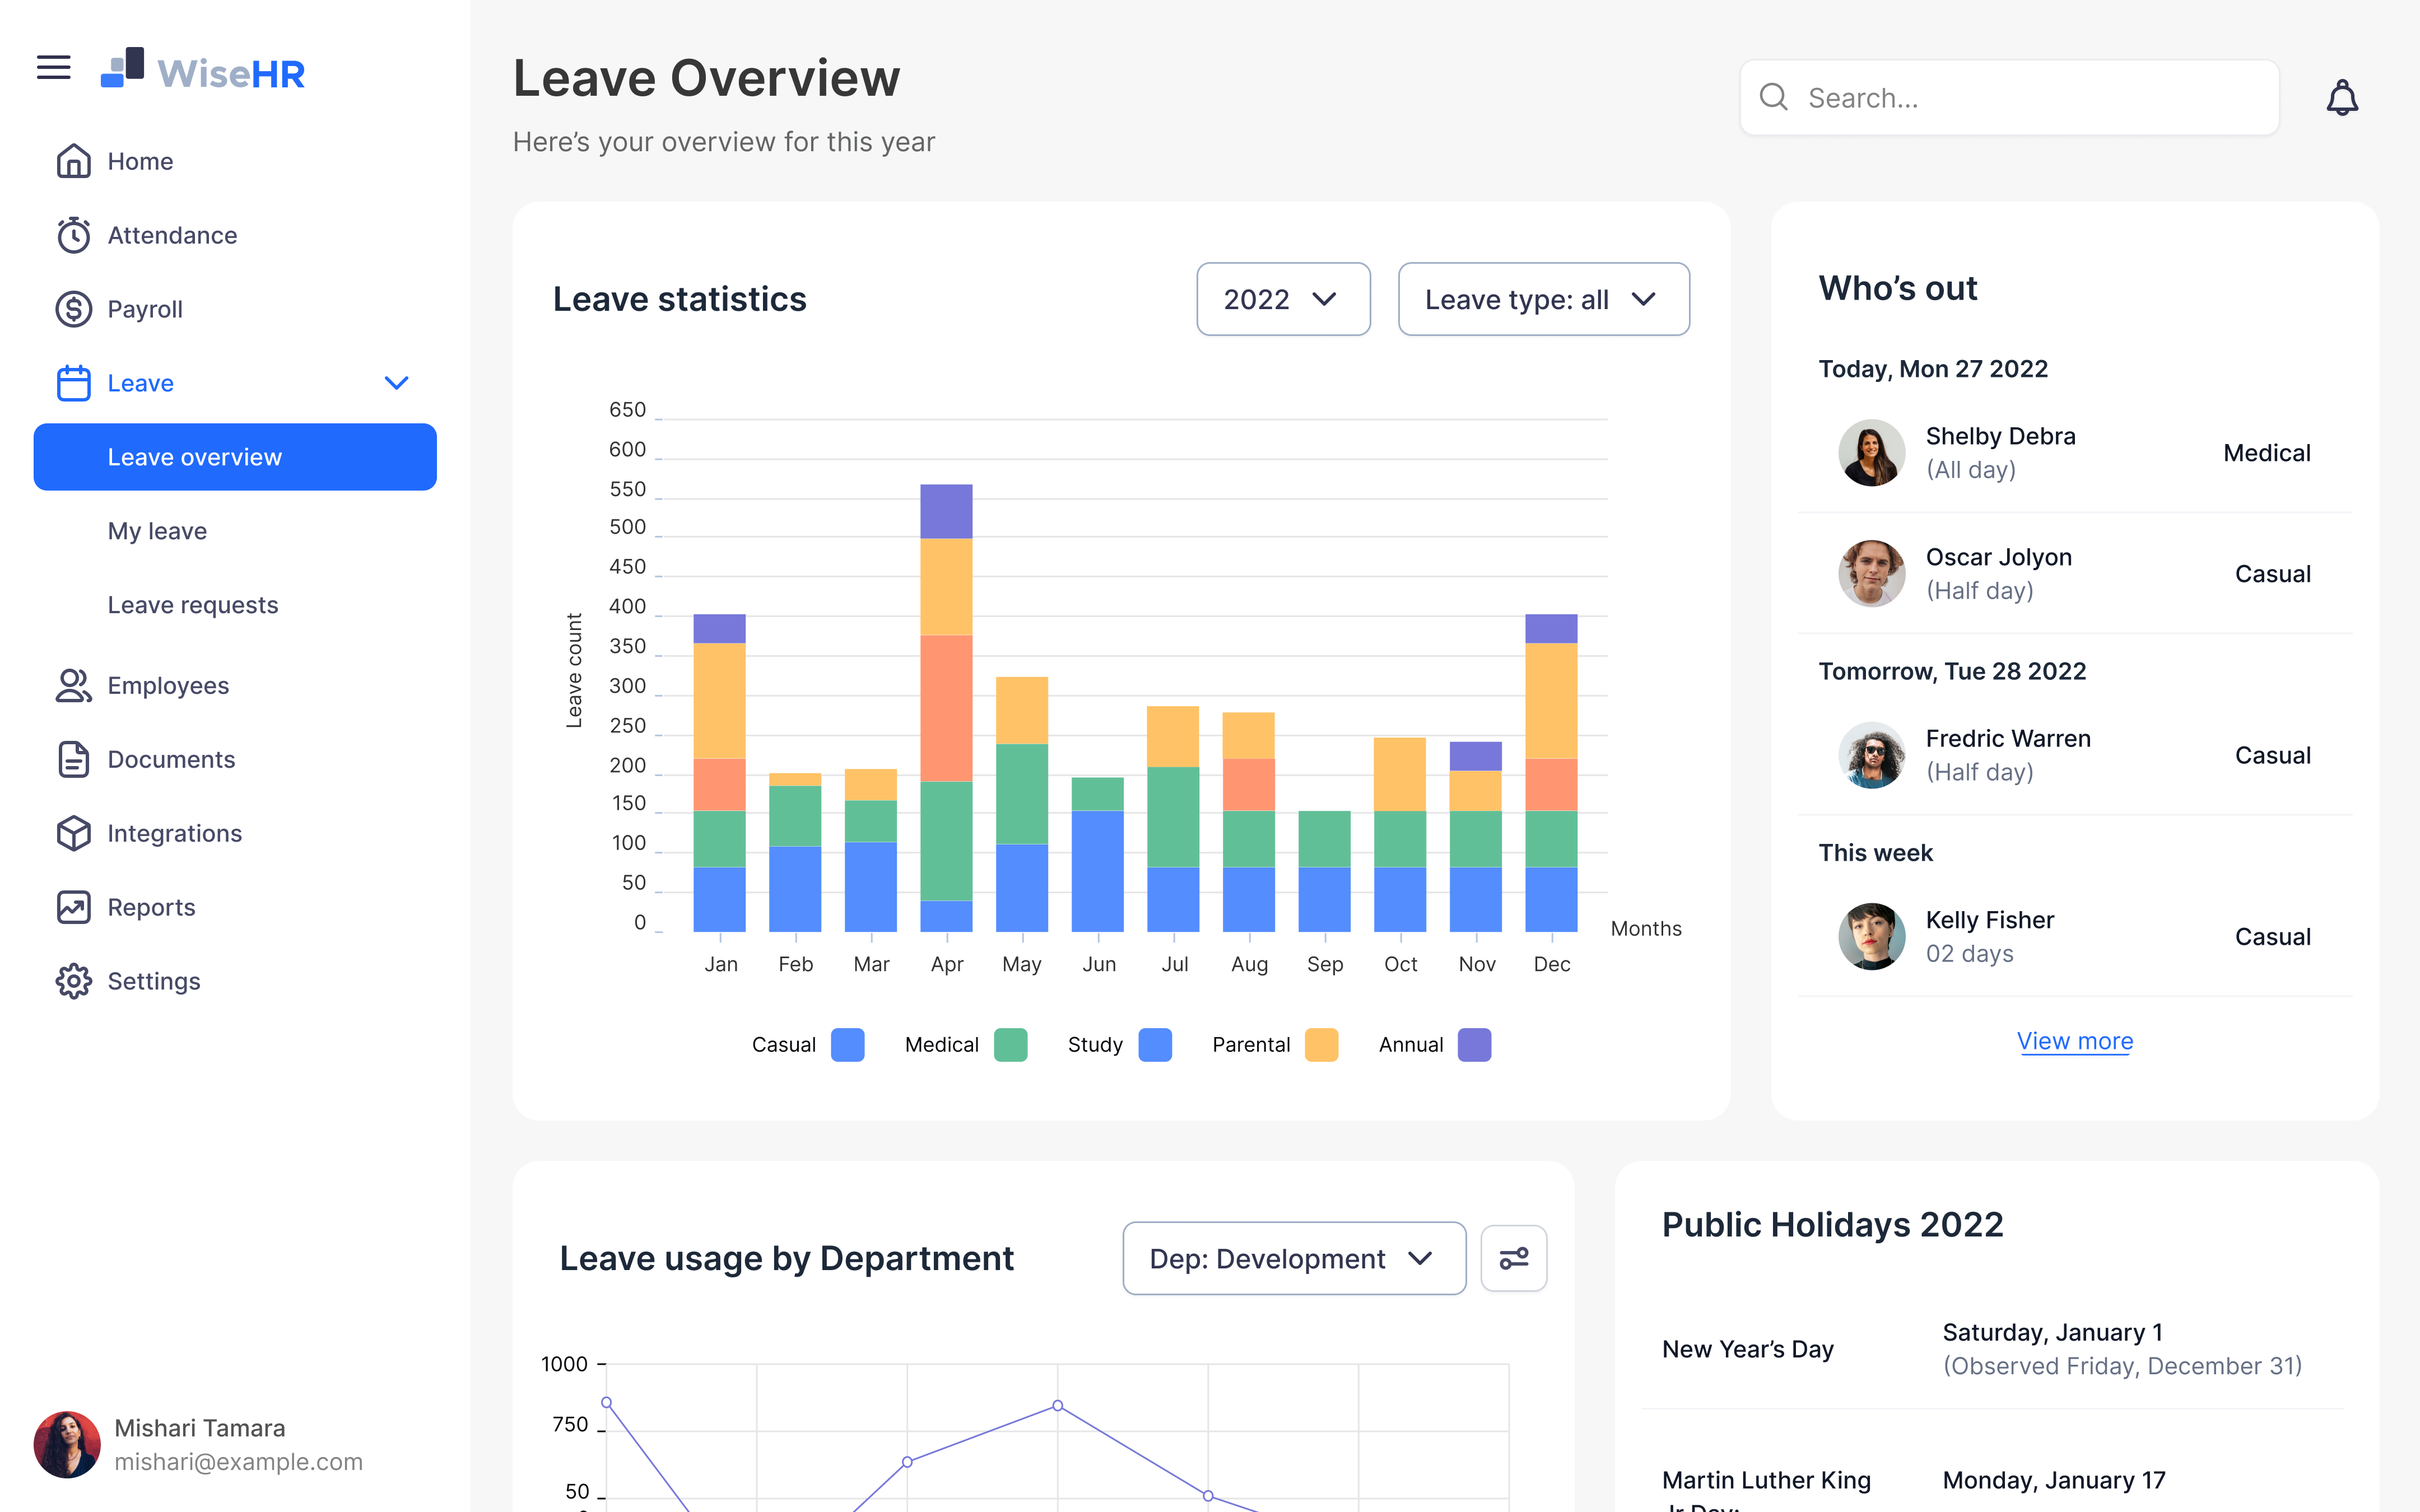
Leave Overview
The Leave Overview UI provides a clear and concise view of leave information. It displays statistics by year and type, highlights who are out on leave, shows leave usage by department, and lists public holidays. This comprehensive view helps users stay informed about their leave status and make informed decisions.
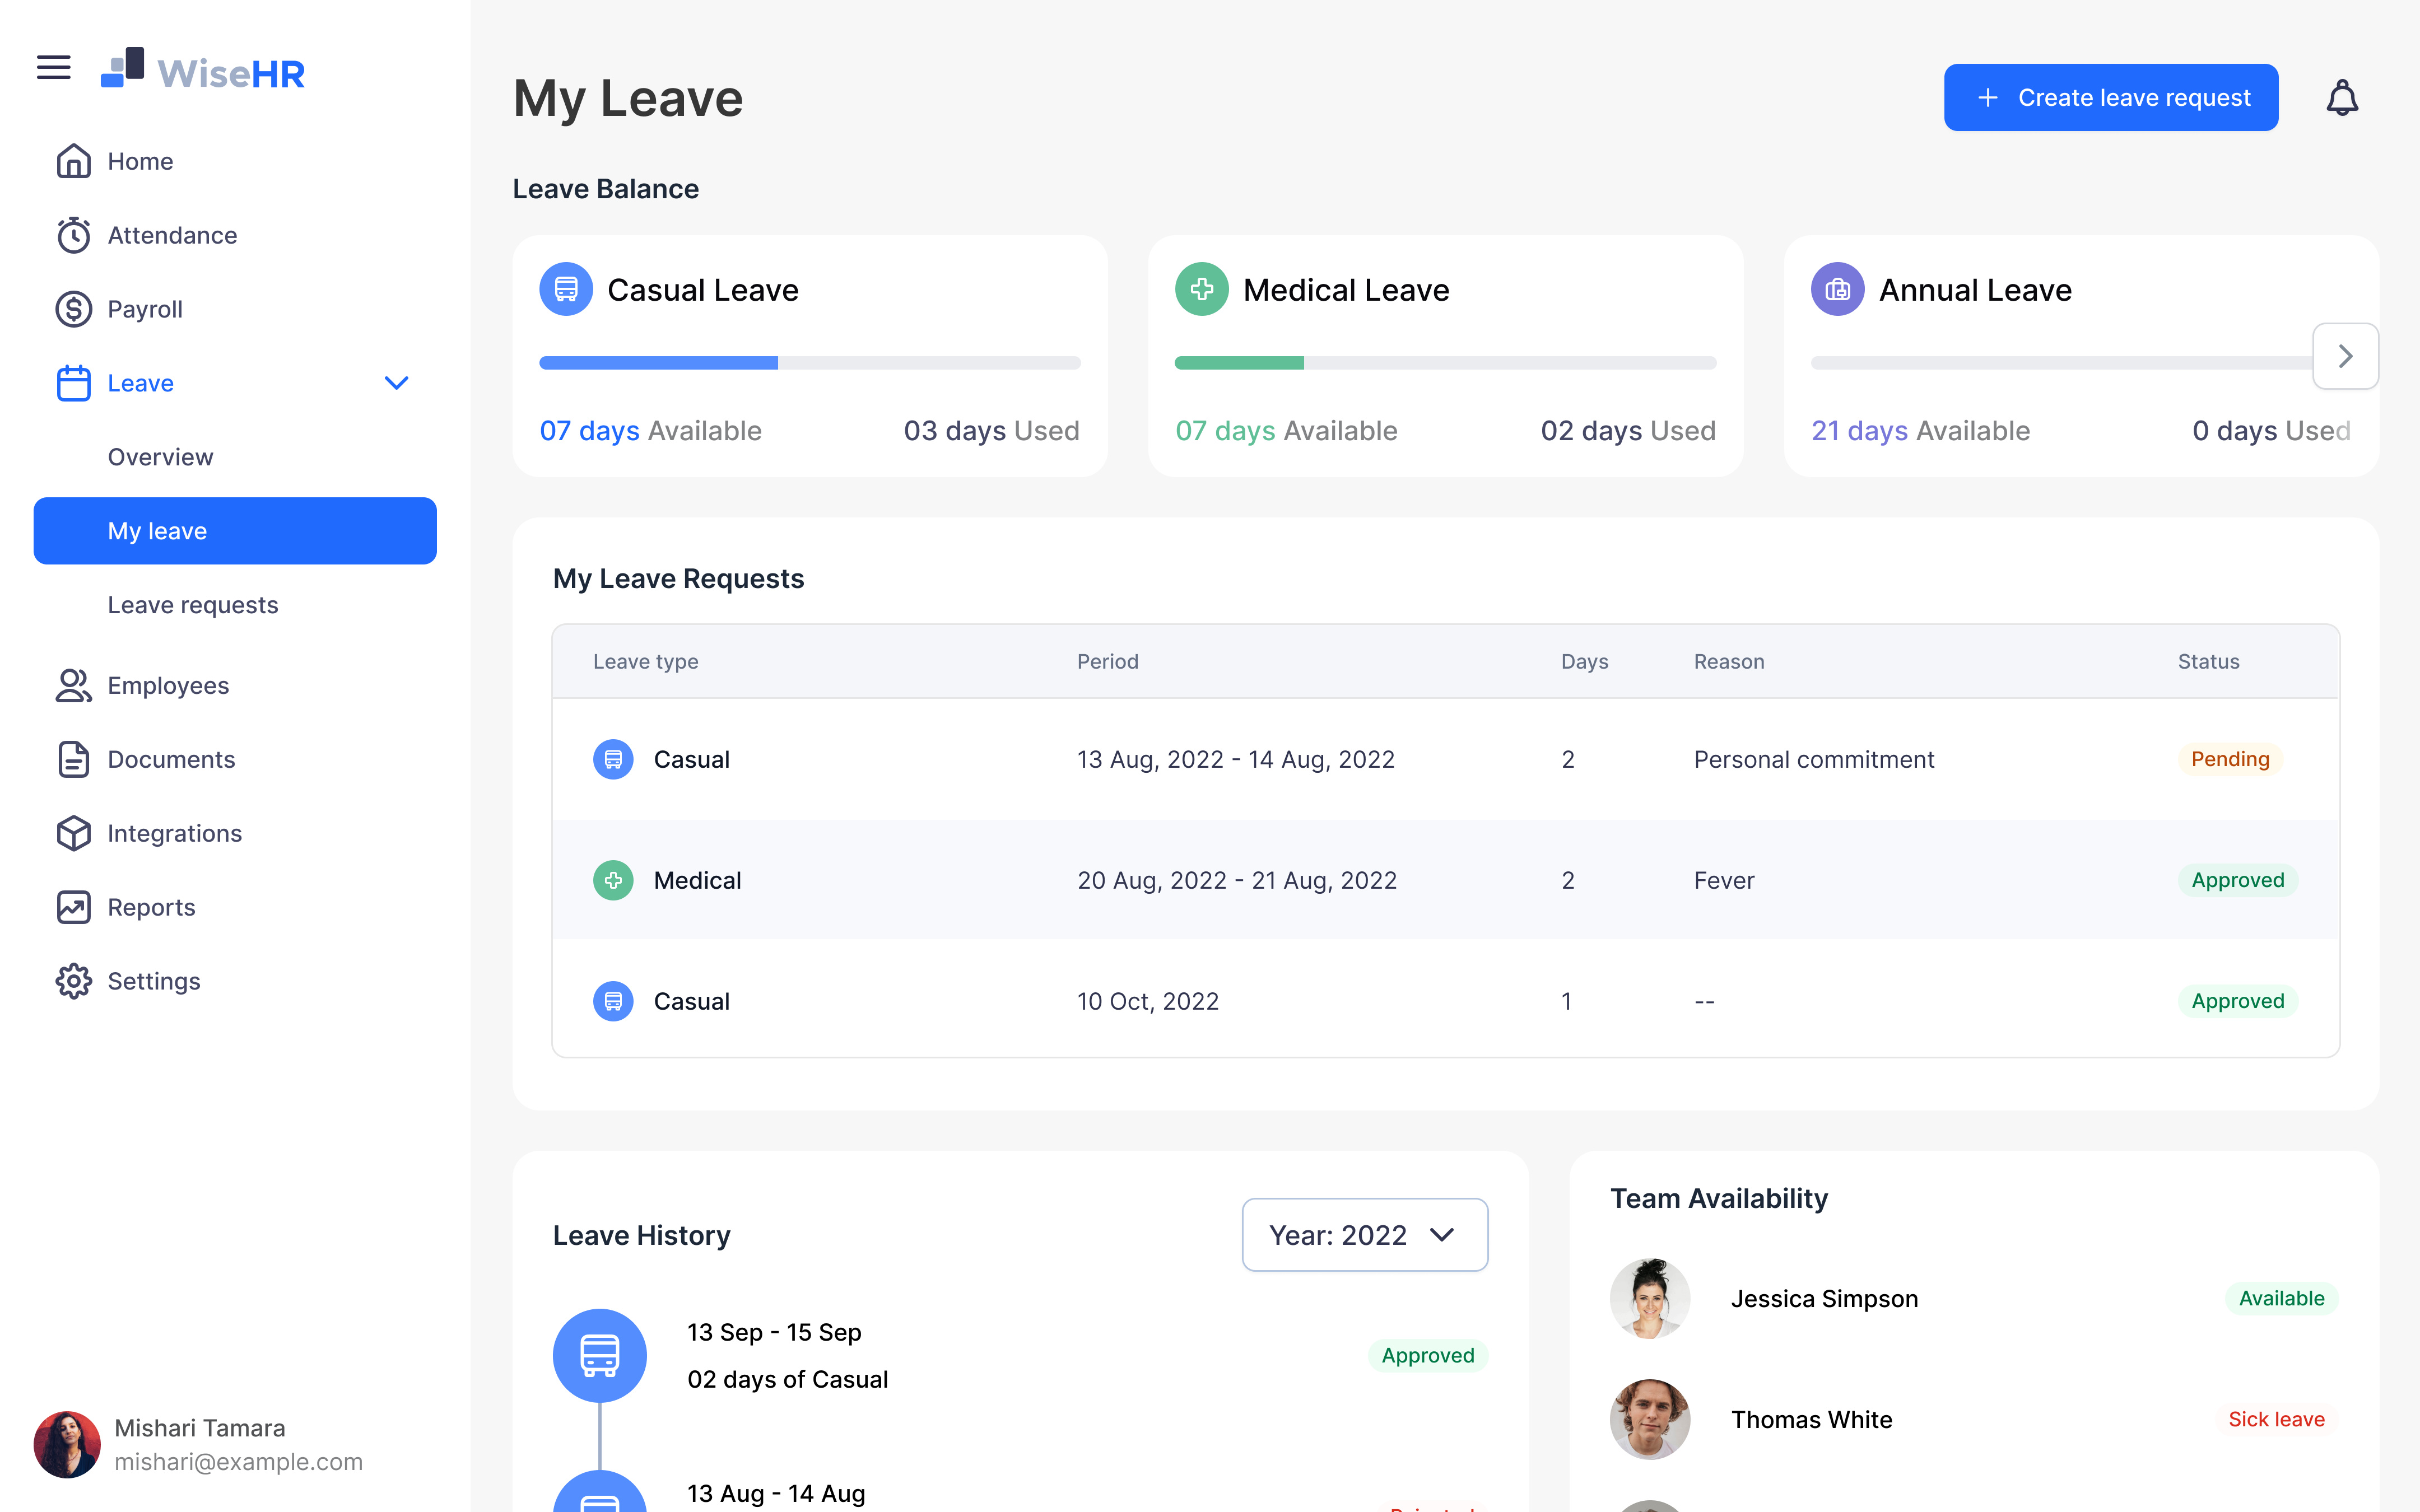
My leave
The My Leave UI streamlines the leave management process for users. It includes a simple option to apply for leave, displays the leave balance by category, tracks leave requests, provides a leave history, and displays team availability. This all-in-one solution simplifies the leave process and provides users with the information they need to make informed decisions.
Create a leave request
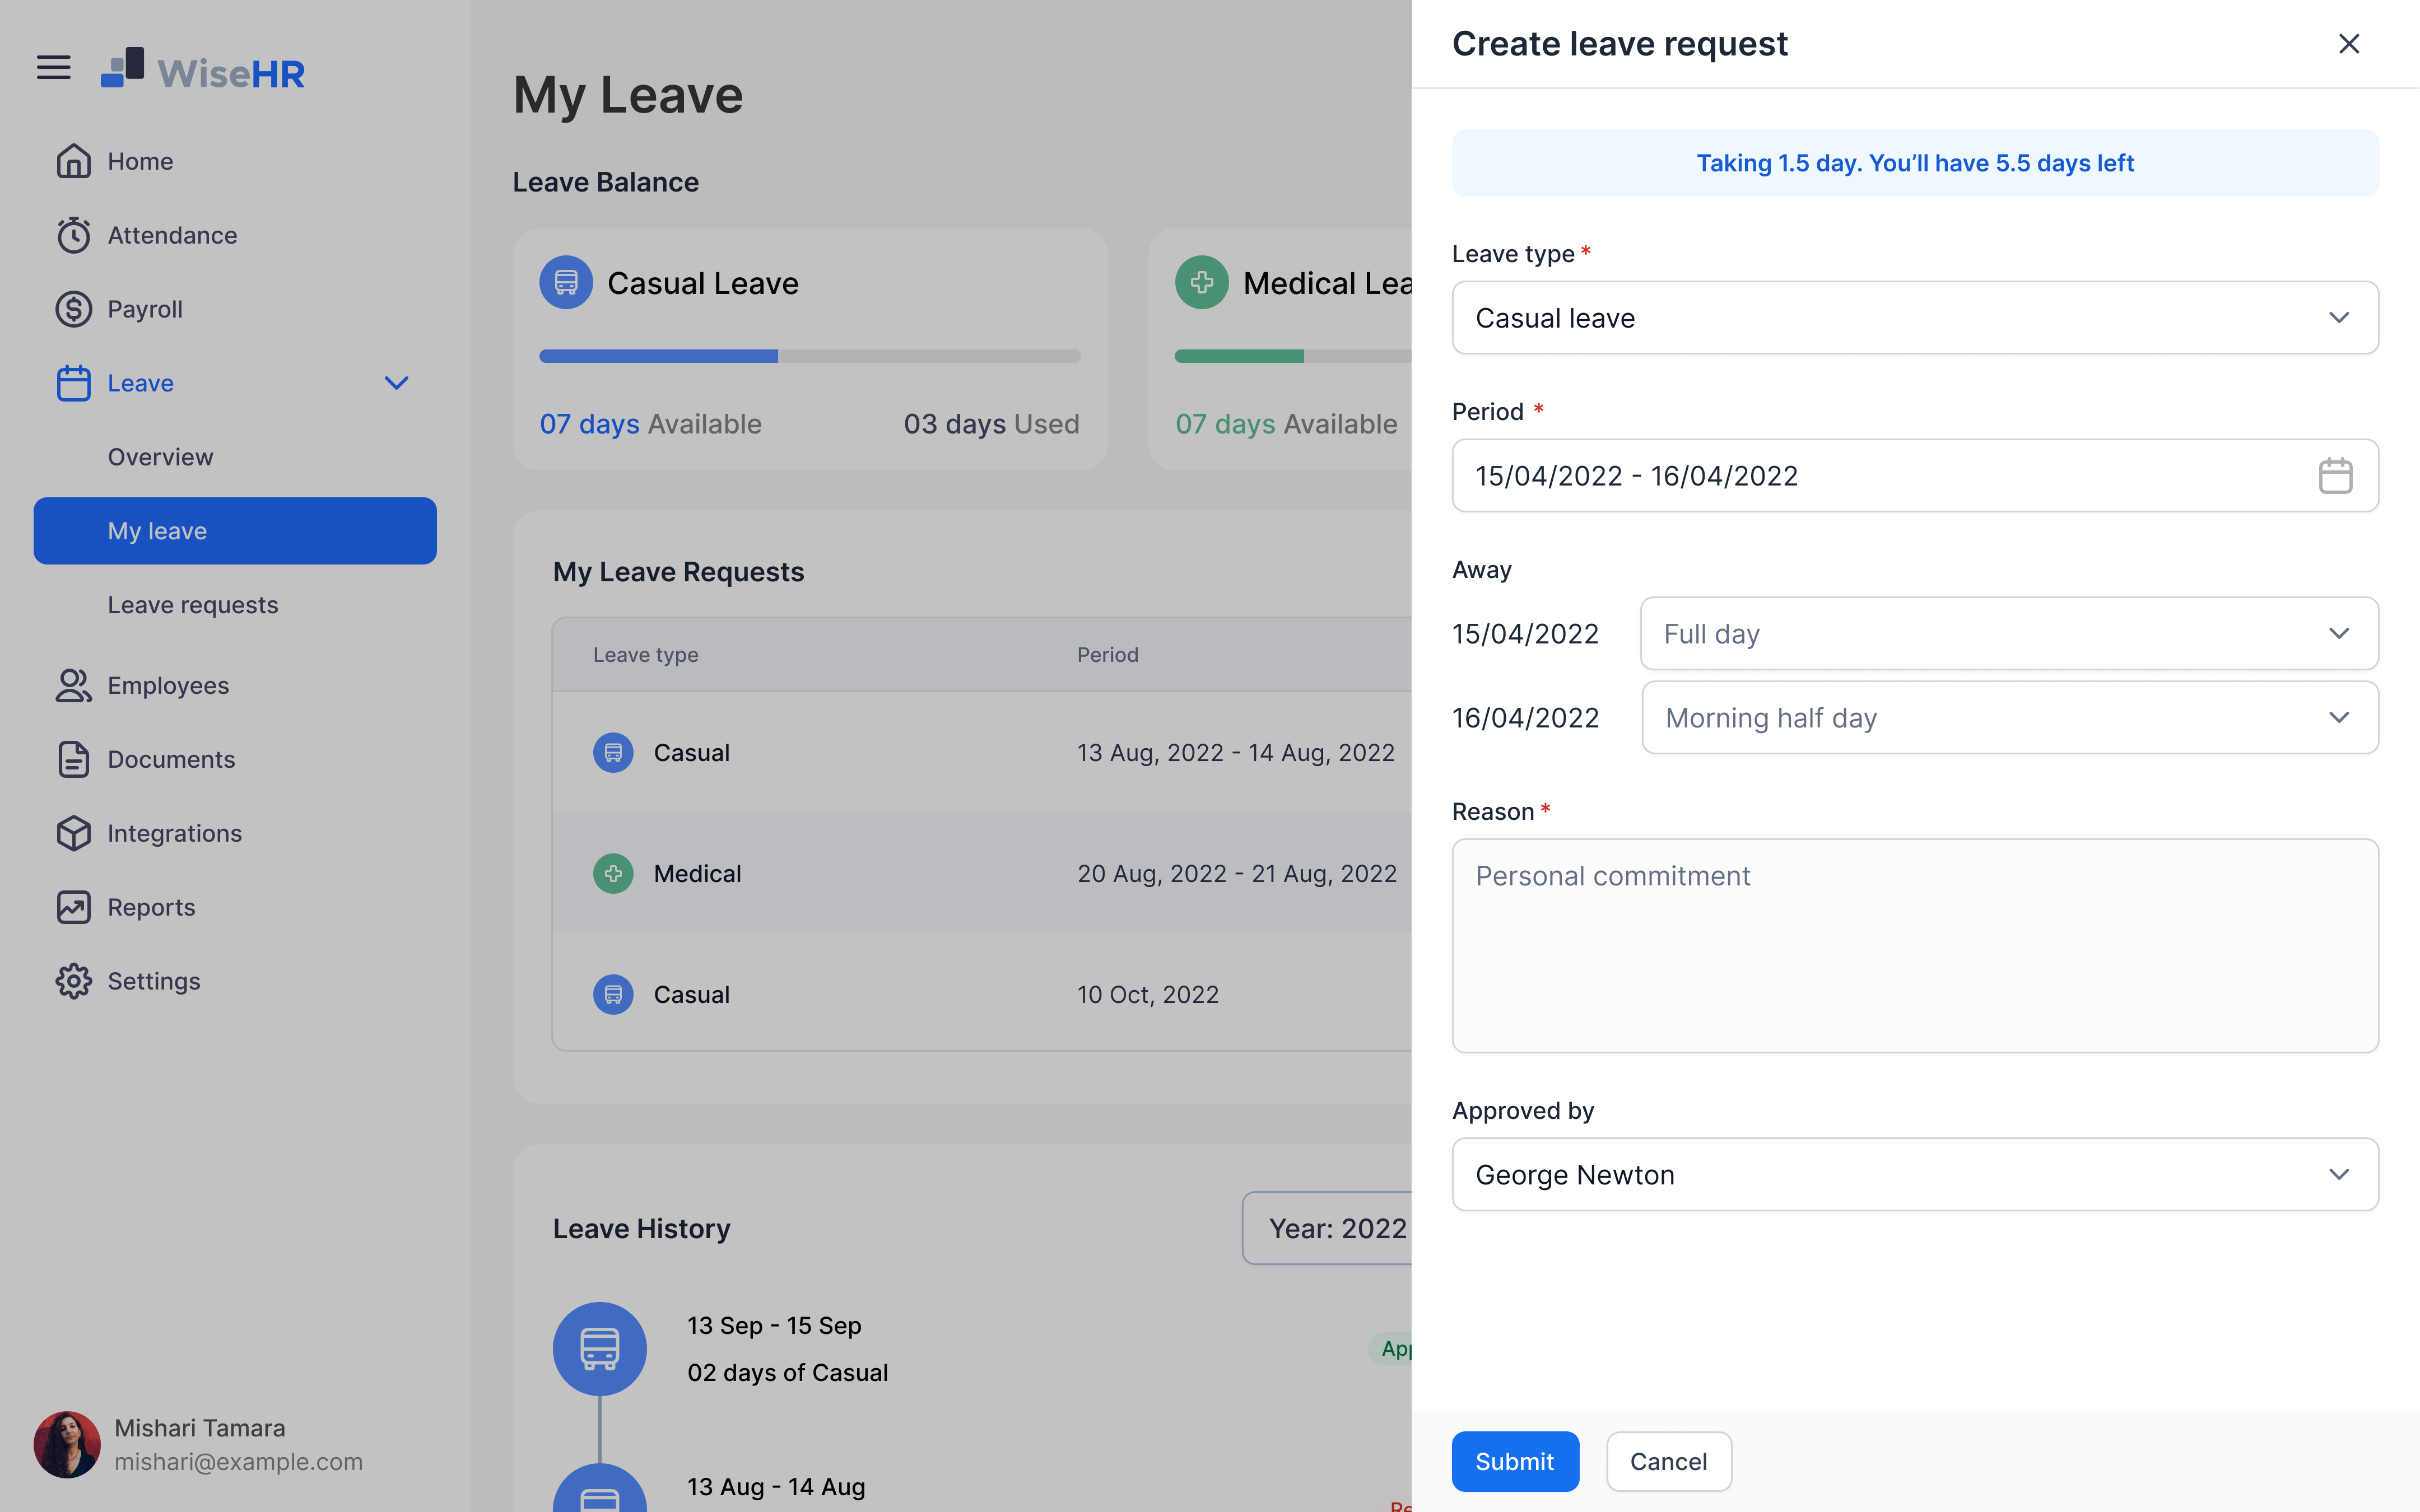
The My Leave UI provides a user-friendly interface for employees to manage their time off. From this UI, they can easily apply for a leave by selecting the leave type, period, and away type (full day, morning half day, evening half day), adding a reason, and specifying the approved by person. This simple and straightforward interface makes it easy for employees to request and manage their time off, improving the overall leave management process.
Leave Requests
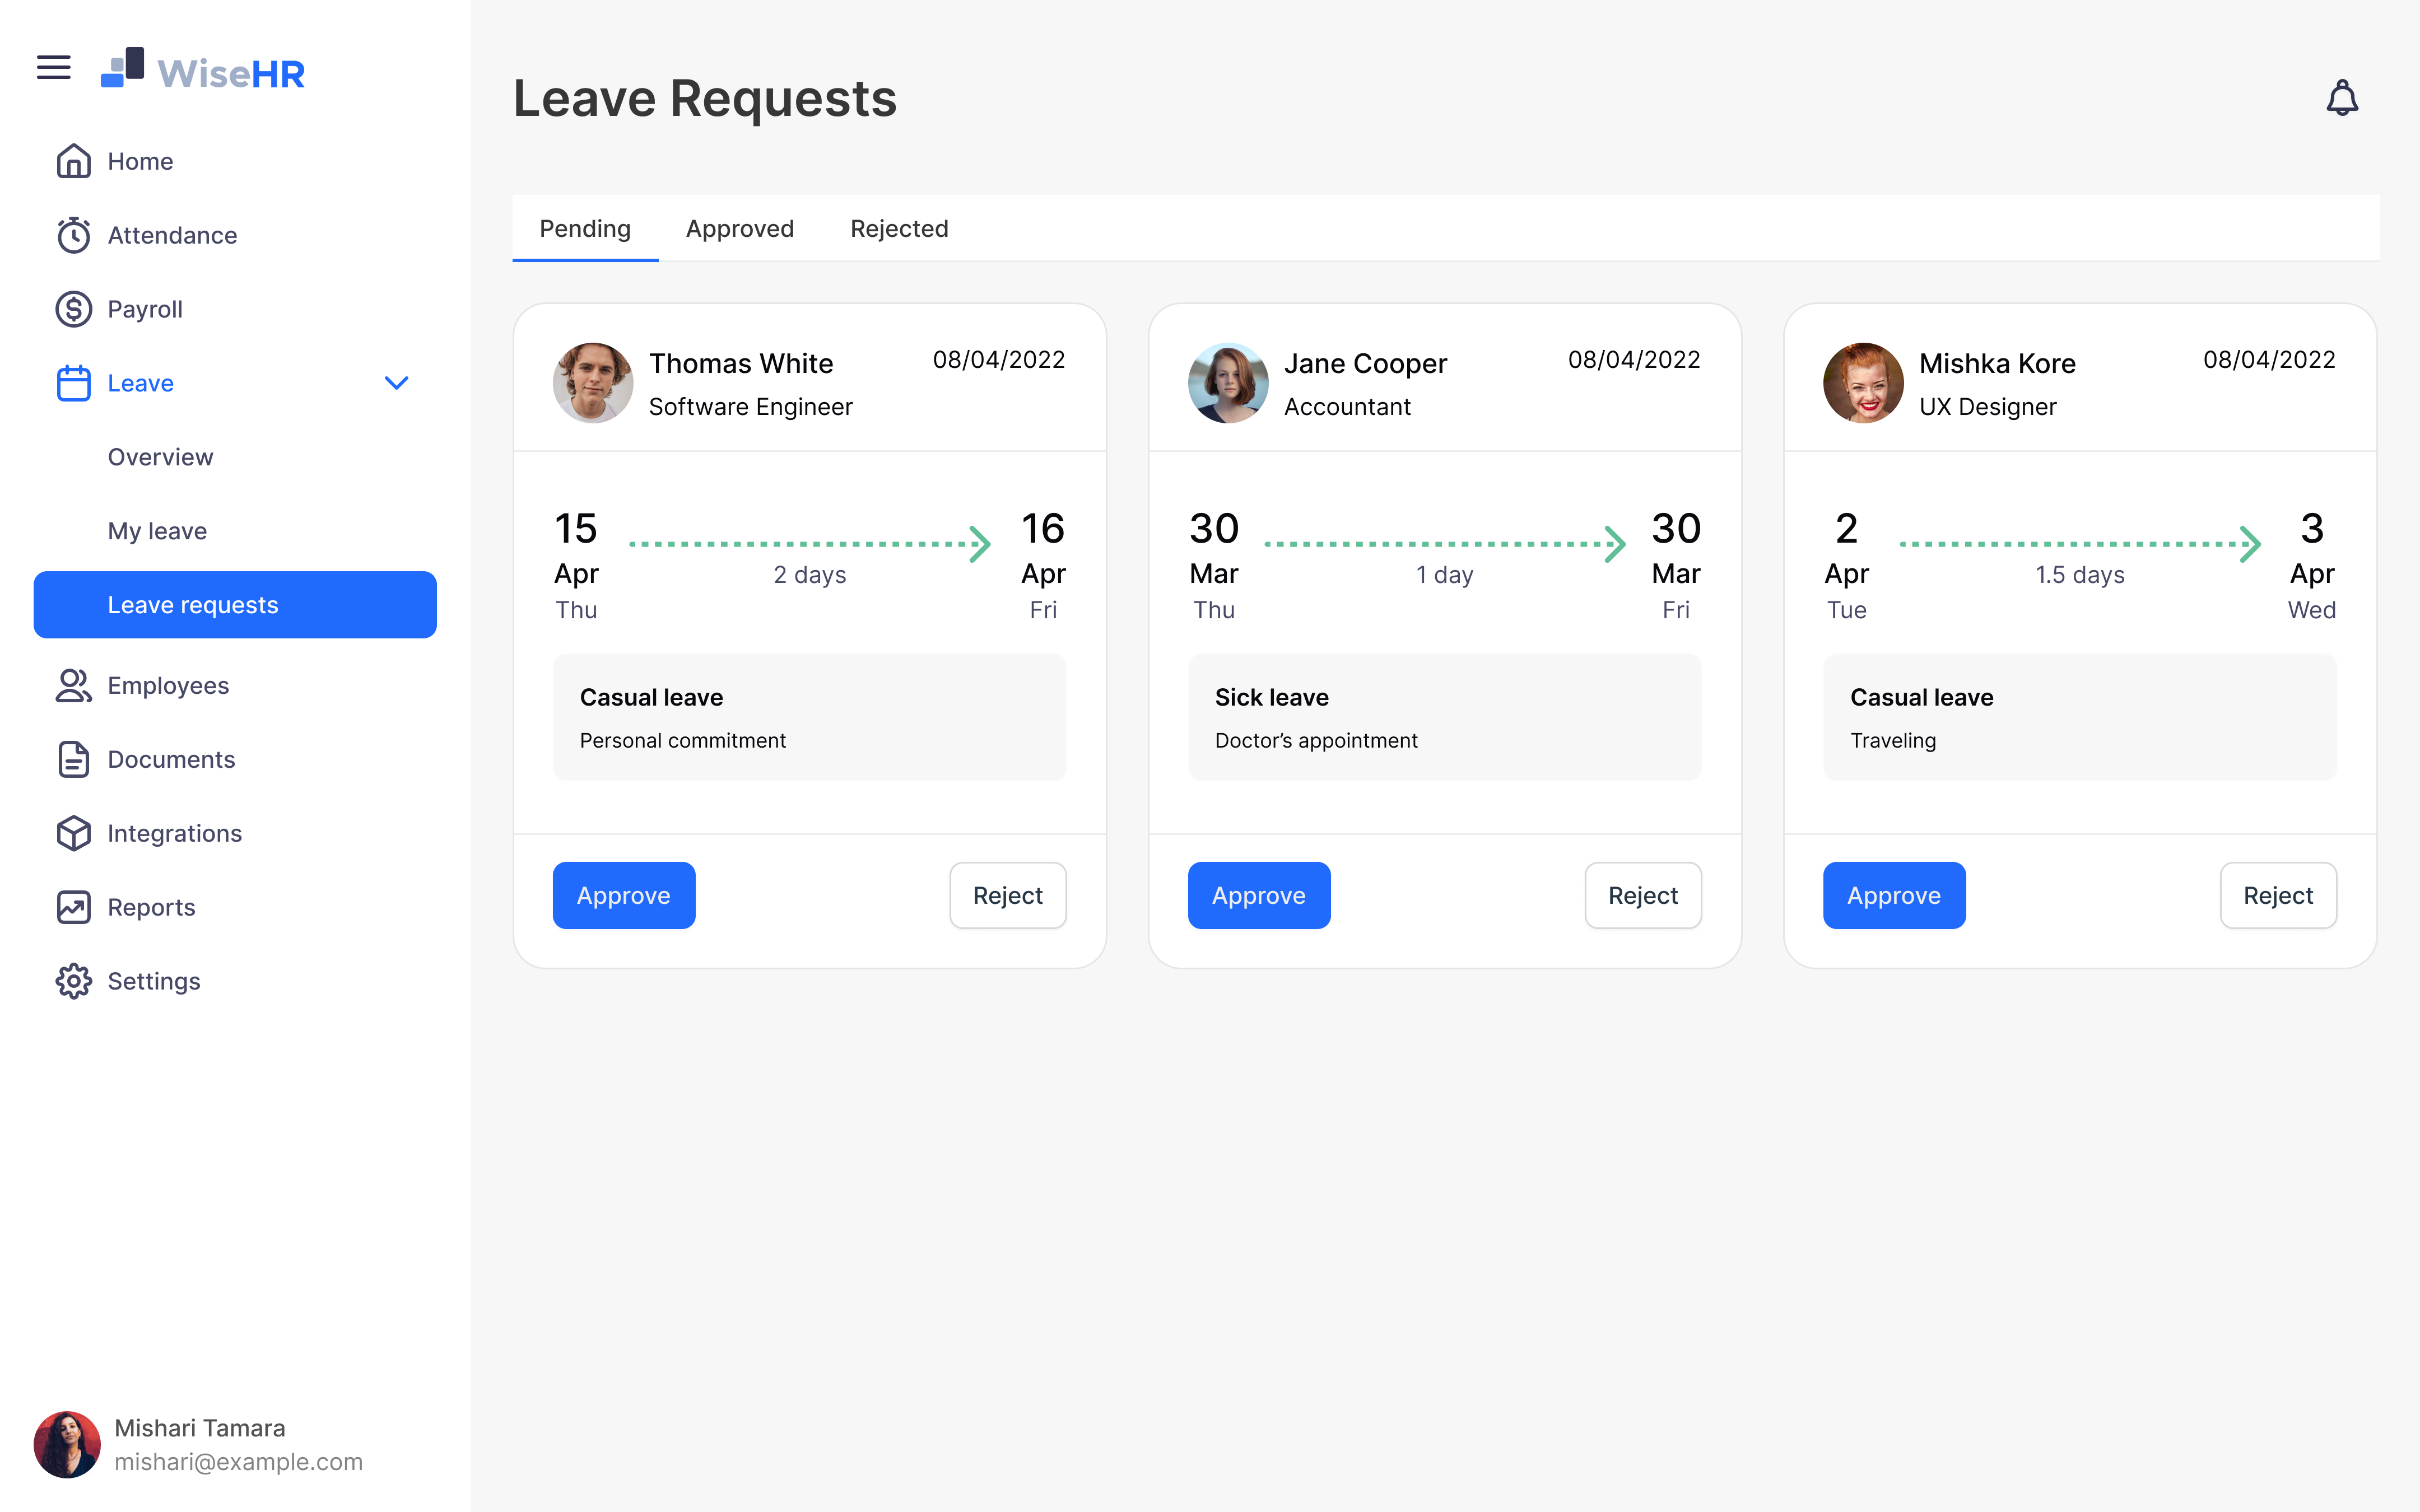
The UI for "My Leave" provides an overview of the user's leave status, allowing them to keep track of their leave requests. In this UI, users can see their pending leave requests, as well as a history of approved and rejected requests. This makes it easy for employees to stay informed about the status of their leave requests and plan accordingly.
Thanks to the hard work of the team, we were able to complete the majority of the high-priority features by the end of the fifth sprint. I then allocated one week of the sixth sprint for pre-launch usability testing and used the final week to stabilize the application and fix any bugs before releasing it to the client's employees. We conducted remote moderated usability testing sessions with five volunteers, each session lasting at least 30 minutes, to test the most crucial user flows.
Key Findings from the Usability Testing
80%
of users happy with the simplified user flow to complete a task.
40%
of users found it difficult to understand some of the terminologies used in the UI.
70%
of users were able to apply a leave without having any errors.
STEP 6
Launch MVP
The pre-launch testing phase proved to be a valuable opportunity for the team to resolve any identified issues prior to the main MVP launch. As planned, the stabilized MVP was released on the designated due date, which was a major accomplishment for me as a first-time project manager.
STEP 7
Practice B.M.L
Following the MVP launch, a review was conducted to gather feedback from the client's employees on the release. This helped to assess the MVP's level of acceptance and competitiveness based on the employees' comments.
Learnings and Outcomes
As a first-time project manager, I found myself diving into the study of agile scrum methodology and project management in order to train new team members who were unfamiliar with the process. In addition to managing the project, I also acted as the UX lead, responsible for reviewing the designs of junior designers and offering guidance to improve their work.
Through this experience, I took note of several important lessons that will inform how I approach future projects and iterations of the application. Following are some of the learnings I got from this project.
- Create a project pipeline
Define the scope of work for each version. - Decide version timeline
The team has a goal to work on being aware of what they are working on. - Continues testing and improvements
For each version to carry out usability testing to improve the product continuously. - Frequent feature requests from the PO which is out of the scope and how to manage those situations.
- Work allocation of the team members for the sprint.
- Prioritize and set due dates for tasks.